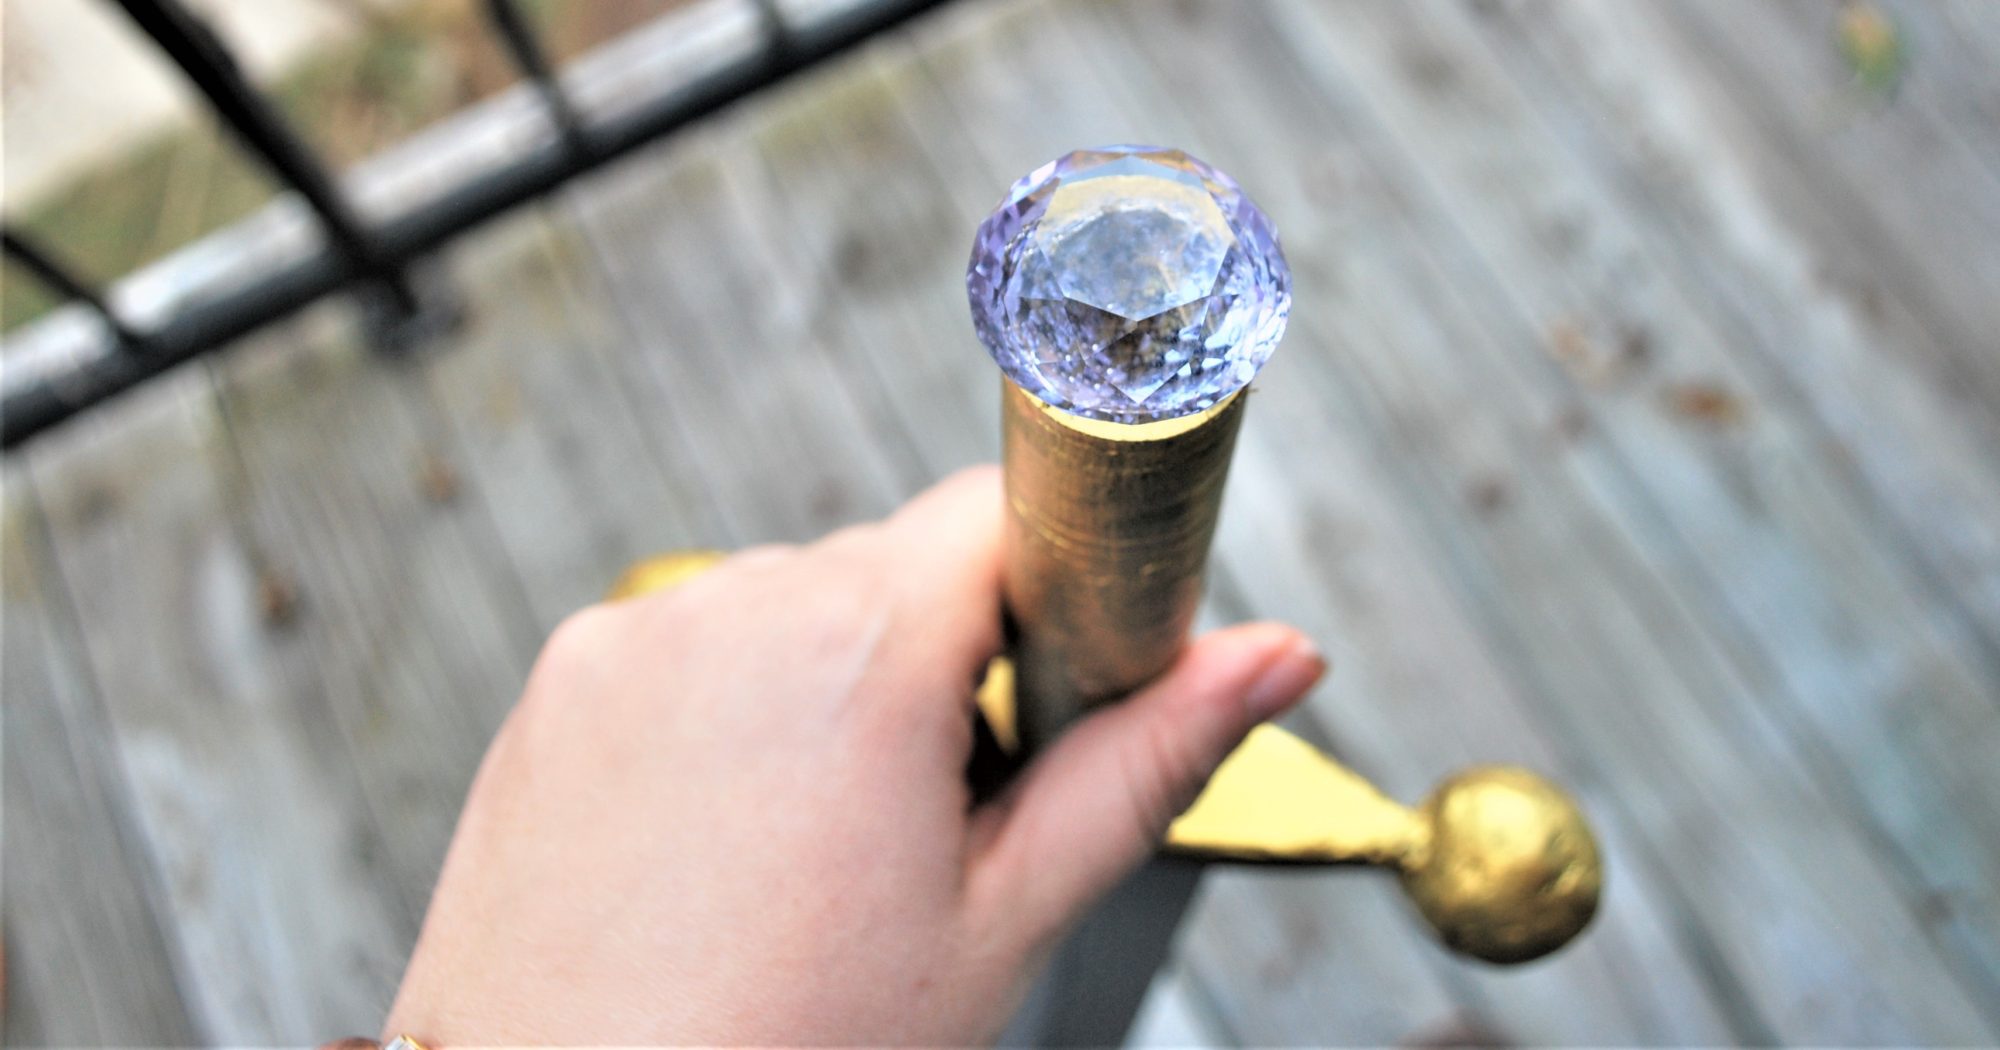
Shiny

This project took me forever.

I was looking up when I ordered the parasol in the first place. It was the end of September. That was a long time ago, wasn’t it?

This is basically the same one I got, which is the perfect size in every way, except it doesn’t fit well on my desk… So painting it sometimes got touchy.

Now, I then didn’t start painting until the first of our snowstorms. Because what else was I to do? So that was February…

I also have nearly no in progress shots, because I worked on it mainly at night, or when it was raining/snowing, neither of which provide enough natural light to take nice pictures. I do have this one though.

For paints, I used the cheap acrylic for all of them. I’m talking the 50 cent paints at Walmart. Maybe they’re a dollar, but either way, very inexpensive.

This might be why I needed nearly three coats to get the green to look solid, not streaky. The yellow and red didn’t have that problem, but the green and I were not getting along.

But the funny thing is, a few days after some snow melted, and we were back in classes, the power went out at home. I’m pretty sure that’s why I woke up before my alarm. Since it may have been three hours till it came back on,  as expected by the power company, I decided to pack up the project and take it into work.

In my defense, I’m still basically only taking classes. This first year of grad school is basically undergrad part 2. So when I don’t have a class until 12, am I going to do work in the morning? Or rather, on a Friday, with no homework due in that class, what am I supposed to do in the early morning?

So I finished it up, and during my mass photography escapade (where I also photographed my shawl, and a yellowtail cami that’s upcoming, and maybe something else too), I got some nice pics.

And there you have it! A lovely parasol in a Kaylee style. Yes, I did wait for the entire post before I mentioned Firefly. Can you notice my restraint?

Because I’ve been squealing internally ever since it was finished.

Foodie Friday #10

It’s been awhile since I’ve done a Foodie Friday…

Perhaps its because I’m lazy, since I’ve certainly been making awesome recipes.

So as much as I like my little explanations, I’ll probably also have some versions like this one. Short sweet descriptions, and then links.

But consider this the super awesomely massive version. Great for number 10!

Empanadas. They’re like the cornish pasties I’d love to make (and haven’t) except smaller! But don’t forget to season the filling… Or be prepared to get out a dip. Like I have to. Hummus for the win!

Mini pop tarts. This weekend was the that of the pie crusts.  These were totally worth it, though I need to invest in a real rolling pin. An empty wine bottle will not cut it.

Pizza dough. I’ve fallen in love with this thick one from Alton Brown and this thin one from Inspiration Kitchen.

Goldfish cheese crackers. Delicious and puffy. Just don’t leave the leftovers in your overheated office… Not a good decision on my part.

Caramels. Still love this recipe to death. You don’t even have to stir!

Risotto pudding. Takes longer than a half hour (like my silly mind thought), but so uber worth it. I did sub in mostly lactose free milk and it was fantastic. Fun fact: Joy the Baker was the first blog I ever followed, and I still do today!

Mom’s soup. No link here, because it’s more of a word of mouth. Diceup any leftover soup worthy veggies you’ve got, saute until soft. Then one can of diced tomatoes to about two cans of chicken stock (give or take). Simmer for at least a half hour, or until you finish whatever else you’re cooking. You know, like risotto pudding…

Hummus. I’m pretty sure I just google it every time, and then ignore the recipes, but this is what I tried last. I added roasted peppers, though, and its amazing. This infographic is cool too. Maybe I’ll try one of those next!

Avocado chocolate mousse. I think it might just be my new favorite dessert. Now, this is the recipe I started with, but I first investigated others. And really I should have stuck with one. But helpful hints: Don’t just pour in chocolate chips. If you wanna use them, melt them first. Perhaps soften any hardened dates BEFORE you try to use them, or else they’ll soften in the refrigerator. Which is fine but odd. Also, if you can let it sit in the fridge for more than two hours, do so… I think it tastes even better. Also it counts as a breakfast replacement. Don’t try to eat it after breakfast, because you won’t want to eat lunch.

Scones. Already hands down my favorite breakfast-dessert. (But don’t worry, pancakes come as a close second) But with this fantastic recipe, you don’t need an egg or any butter. Just heavy cream. I actually used whipping cream, and I subbed in chocolate chips for currants. My new favorite recipe. Period.

Barley. Now this is simply just how to cook barley, but I had been carting around some barley for years, so I was happy to learn how to make it. And I do happen to love it. Though I’ll make it with chicken stock or salted water next time.

Tomato sauce. Simple, but I’ve been getting these delightful cherry and plum sized tomato buckets from Sam’s Club, and they are fantastic. So I thought, oh, I’ll just roast up some tomatoes and put it into my food processor with some garlic. I may have added the oil too. It’s delicious. And definitely use it for both pizza and pasta.

Pasta. Definitely try out this. Though invest in a rolling pin if you don’t have one. May I repeat. An empty wine bottle is not a replacement. P.S. I froze mine, and they still cook up a dream!

Nutella-ish. Try and follow a recipe. This one is a great one too! Don’t improvise unless you know what you’re doing. Or else you’ll come out with something like dough. And then try to smooth it out with oil. And then consequently, straight from the fridge your Nutella-ish will not be spreadable. Smooshable, but not quite spreadable. Great on the scones though!

So that’s it for this extended Foodie Friday!

I know that I’m forgetting a thing or two, so I can just tack them on to any future post.

See you next week!

2nd Blogiversary

When I went back to check when I had posted my first blogiversary post on Monday, I realized that it was in fact on 3/2, but that I hadn’t posted my first post until 3/4. So this year I’m honoring that.

Another year, another set of changes.

In the past year I’ve:

DSC02106

Almost made jeans! (And I’m hoping to try out Ginger Jeans this year)

DSC01855

Graduated college! (And also made my graduation dress! My mom and grandmom may have teared up a bit with that… But it could also have been the graduating)

day6

Participated in Me Made May!

teaser

Moved south for graduate school! (Which is also where I started taking a few pictures outside)

And I’ve actually started graduate school, for the record. Passed all my first semester classes too!

two

Knitted my first socks! (and second and third)

welsh

Started up my Foodie Friday posts, and kept it going successfully for a while. And don’t worry, it shall continue!

teaser

Made a purse that I use everywhere. It’s my tutoring purse (always at the ready with Sharpies), my ballroom dance purse (surprisingly my dance shoes fit in too), and my day-trip purse, for those all day shopping trips that require fifteen billion reusable bags. They all fit too. Not all of these at once, of course, but it’s still fantastic.

duo

Sculpted Groot. Nuff said.

front

Used special yarn and fabric. First fabric my friend brought me from Uganda

pinned

… and then (very) recently Christmas yarn from a few years ago!

inside

Made Susan’s quiver. Biggest leather project to date!

closer

Participated in my first Monthly Stitch challenges: Let Them Sew Cake and Geek Out!

I keep meaning to get into a few more, but I tend to miss them by a couple of days. Meaning, I start the project a few days too late.


So that’s what I’ve been up to.

Here’s to another great year!


Cornflower Shawl

Guess what’s off my needles! (Hint: It’s in the title.)

I finished the shawl!

full

So the full details:

This is the Wavedeck Shawl by Kate Atherly in Knitty Winter 2014.

I did get a little impatient, and I skipped a few rows of edging and zig zags, but it’s the first non-sock pattern that I didn’t end up making big changes to! Normally I don’t like the way that its bound, or I’m too impatient for long sleeves, etc. But not this time… partially because I would have no idea what to do in order to change things, but mostly because I love it just the way it is.

This was Christmas yarn from over 3 years ago… I picked it out when we moved my brother into college as a freshman, and my parents kept it for me until Christmas. The yarn is Debbie Bliss Prima, which is now discontinued I’m afraid, but its a nice thick DK or thin worsted, as it almost worked out for me. Part bamboo and part merino, so its just warm enough, but not overly warm.

back

It felt like it took forever, but I think it was a February and February alone project, which is nifty. I like finishing projects within a month of starting them, and bonus points for actually getting pictures and posting about it.

I was going to take a picture with my coat on, ready to go to school, but when I went outside to take these and a few other sets of pictures, I realized that it was too warm to do that. Despite all the melting snow that I cropped out of these pictures, it was quite warm.

pinned

But the way that I’ve already fallen in love with wearing it is with my shawl pin. So woot! A use for my shawl pin!


My Own Thread Holder!

Over the break I inherited a large quantity of thread.

Now, this may be the best thing ever, since I almost never remember thread, and often the seams of my clothes end up in black or white, depending on the color of the material.

So now I have colors… but I had nowhere to put them. They were holed up in bags stuffed up next to other sewing notions.

There are so many cool thread holder tutorials on the internet, and plenty more without for inspiration. I needed a low profile one, so I could hang it on a wall, regardless of whether there was a table underneath, and one that I could customize for different sized yarns.

So I bookmarked a few tutorials and said, once I get my paycheck I’ll go out and get supplies.

desk

This Saturday I did! A few paychecks later, of course. Because procrastination is my middle name.

All in all, the wood, sandpaper, and nails came to about $15. I already had E600, and then I spent $2.50 on acrylic paints, which left plenty over. I also got a piece of foam board from the dollar store to make a back, and I need another to cover up the top shelf.  Home Depot has a cutting station, so I asked them to cut the furring boards into two foot pieces. (For materials and a word-walk through, see here!)

Saturday afternoon and evening I put together the frame. It took me much longer than I had to, partially because I don’t have clamps, and partially because I had to cut an inch off of two of the boards.

Be warned that when the cutting station has a sign that says they can’t guarantee exact measurements, it’s probably there for a reason. Like they don’t always get even cuts.

So I got out the dinky hack saw that my dad insisted I put into my toolbox, and sawed. Pretty badly too, but I got it done, and managed to sand away the worst of my mistakes.

backlight

A few of the pieces were a bit warped, which I think adds to the charm, and so I didn’t care at all about getting perfect right angles, as long as the pieces fit okay.

The next morning I rescued the frame from the cold outside and hammered nails into each shelf to keep the entire thing together and then set to work on hammering in millions of nails for the bobbins. I wasn’t terribly successful, but I managed to get about 23 in per shelf, spaced one inch apart. It’s probably best to not look at my thumb for another couple of days… It was hit too many times.

Because so many of the nails were very crooked, I decided to paint them blue just like the rest of the insides as an attempt to cover up. I think it worked out pretty well!

The aqua and the white match it up well to the rest of my decor.

For the first woodworking project since I was in middle school in shop class, I think I did alright!

A tip though, get the size nails they suggest. Substituting longer and thicker ones was not much fun.

sofa

All in all, for about $20 I have a nice little functional bit of thready fun!

Tardis Corset Belt

right2

I had already told you a few months ago now that I wanted to work on something new with leather, which is why I needed to finish the quiver so desperately.

It really was the need to make my Tardis belt.

right1

As I’ve told you before, I wanted to wear at least part of my costume for Halloween, and a big part of the costume for me at least was the corset-belt, since it was supposed to represent a good portion of the Tardis. Before starting it, I had planned for it to represent the console, but upon further reflection (and me forgetting that was my plan) it all changed.

left2

First up was the “muslin”, in order to see if my design would even work. I used the same cardboard from my quiver, and cut out a pattern that would fit around my hips, go up a bit in the back, and not impede any future bustle arrangements. It took some wiggling and some cutting down before I hit the right shape, but it was worth it.

I took a leather belly and lined up my pattern pieces to fit on it efficiently. My goal with leather is to always keep as much as possible, and since there isn’t exactly a grain this is totally possible, unlike fabric.

left1

I used this funky tool that I had found in a scrap drawer to draw my pattern, and cut it out with a swivel knife very carefully to keep the circles as circular as possible.

I then got to the tooling, which ended up being more strenuous than I thought. I had run into the quandary of how much of this should be in relief, and how much raised. I ended up deciding that the round things should be raised, so I had to tamp down the entire background. Love the round things! A sore wrist later, the tooling was done.

more full

Lacing was kind of required, though, since this was destined to be a corset. But how? I tested a few methods and lacing cords, but punching holes ended up being the best option.

At that point I considered it done… until Halloween morning. Then I decided that sparkles were necessary, and I painted the borders gold and glued on sequins to the round things.

roundthings

And finally it was truly done, at least enough for Halloween! I may end up painting some more, but I’m pretty pleased with it!

What’s on My Needles Wednesday – New Socks and Shawl

top

I’ve been working with yarn more this year than ever before, and not just because 2/3 of the Christmas presents I gave were knitted.

detail

So I’m going to be sharing pics of what I’m working on. Most of the posts will have minimal wording, unless I’ve finished something.

foot

For instance these orange socks are done, made up with the Water to Sky Anklet pattern, which worked up beautifully in this alarmingly bright orange sock yarn. And look at the cool pattern they left on my feet (likely due to a snug shoe, so don’t be alarmed)!

full

The wrap has a long way to go…


TARDIS Cape

My homage to the phone box. The only part of my costume that screams Tardis…

This was the next thing I made after the jacket, since I knew that I would just be able to hook into the jacket and not need to worry about it afterward.

front

I bought this satin backed with twill, I think, last year with the side purpose of using it for this cape.

I had also bought a roll of the really wide black ribbon.

But I just couldn’t get myself to put it together. After my issues of the Belle cape not really fitting over my head, I had just started procrastinating.

So once I had the jacket made up, I finally decided that it was time. I cut out a half circle, I believe, and a hood from my royal blue fabric. I made sure that the hood was larger than the last time.

hood

Then I took the ribbon and attached it to the edge of the hood. I had thought about adding it to the edge of the cape, but it wouldn’t have worked out with the circular edge.

I sewed it all up, included a gold lining to the hood, but not the length, and used a rolled hem for the length of the hem. It all sewed up smoothly.

back

But of course I didn’t work on the lettering until the morning of Halloween. One of my classes had been canceled on the fateful Friday, but I still had to go in for the second, where I was leading a discussion. So I decked myself out in a light version of Belle, and got to work on lettering and sparklies on other costume parts. I used puffy paint to write out the letters, but I tried to get them as block-y as possible, as well as even, which I may have sacrificed a bit. I centered the Public Call segment, but then Police and Box weren’t even.

words

When I got back from class, though, the puffy paint was still wet! I ended up carrying the cape very carefully and separately from the rest of my costume until we were almost ready to leave for the festivities.

It worked out, though, for the most part.

The hood is not comfortable to wear when attached to the jacket, so I’m considering added a thread loop, so I can wear the cape on the jacket or around my neck.

Decisions, decisions.

See you next week!

TARDIS Tuesday – Cropped Jacket

I’ve determined that Tuesdays are going to be TARDIS themed here in my little corner of the internet.

You see, I decided the week before Halloween that I wanted to wear my Tardis costume, if I finished it in time. But at that point I had completed less than half of it.

It’s time to share my trials in completing these four pieces of my costume, and maybe by then I’ll have worked a bit on the skirt!

The first part of the total costume  I made was a bolero jacket. I had just completed my Sorbetto and figured that would be a good pattern to build off of for this jacket. It was actually almost a month before Halloween, but my momentum stalled after I finished it… that does seem to happen a bit.

fixed

I knew it was going to end up over a button up shirt, so it couldn’t be skintight, and it had to be comfortable as well. Remember me telling you about this weird shirting fabric that I used to line my graduation dress? It made another appearance as a muslin and subsequent underlining here! It provides a good amount of weight to the jacket which really makes it lay beautifully.

For the pattern, I just folded the pattern at the pleat and traced the shape off. I rounded the front up to the center and added some darts at the back. Then I realized that in order to use the button that I’ve been saving for over a year I would either need to overlap the front or create a button tab. My buttonhole ended up a bit screwy, and I don’t have matching thread, so I’ll probably redo it, but it worked in a pinch.

Some bars were added on in order to attach the cape, and some beads… the beads. I wanted to incorporate these lovely pendants that I repurposed from vintage earrings, and when I saw Journey to the Center of the Tardis I thought they would be perfect in that context, but I still wanted to use gold fake pearls… until I ran out of them. So I added some silver ones. And then a strand of them fell off during Halloween night. So I need to do some fixing.

closerThe strand that fell off is discreetly on the other side of the jacket in these pictures. Because I was feeling a bit shameful.

But there’s my jacket!

(When I can get pictures of me actually wearing it, I’ll update the post!)