My Own Thread Holder!

Over the break I inherited a large quantity of thread.

Now, this may be the best thing ever, since I almost never remember thread, and often the seams of my clothes end up in black or white, depending on the color of the material.

So now I have colors… but I had nowhere to put them. They were holed up in bags stuffed up next to other sewing notions.

There are so many cool thread holder tutorials on the internet, and plenty more without for inspiration. I needed a low profile one, so I could hang it on a wall, regardless of whether there was a table underneath, and one that I could customize for different sized yarns.

So I bookmarked a few tutorials and said, once I get my paycheck I’ll go out and get supplies.

desk

This Saturday I did! A few paychecks later, of course. Because procrastination is my middle name.

All in all, the wood, sandpaper, and nails came to about $15. I already had E600, and then I spent $2.50 on acrylic paints, which left plenty over. I also got a piece of foam board from the dollar store to make a back, and I need another to cover up the top shelf.  Home Depot has a cutting station, so I asked them to cut the furring boards into two foot pieces. (For materials and a word-walk through, see here!)

Saturday afternoon and evening I put together the frame. It took me much longer than I had to, partially because I don’t have clamps, and partially because I had to cut an inch off of two of the boards.

Be warned that when the cutting station has a sign that says they can’t guarantee exact measurements, it’s probably there for a reason. Like they don’t always get even cuts.

So I got out the dinky hack saw that my dad insisted I put into my toolbox, and sawed. Pretty badly too, but I got it done, and managed to sand away the worst of my mistakes.

backlight

A few of the pieces were a bit warped, which I think adds to the charm, and so I didn’t care at all about getting perfect right angles, as long as the pieces fit okay.

The next morning I rescued the frame from the cold outside and hammered nails into each shelf to keep the entire thing together and then set to work on hammering in millions of nails for the bobbins. I wasn’t terribly successful, but I managed to get about 23 in per shelf, spaced one inch apart. It’s probably best to not look at my thumb for another couple of days… It was hit too many times.

Because so many of the nails were very crooked, I decided to paint them blue just like the rest of the insides as an attempt to cover up. I think it worked out pretty well!

The aqua and the white match it up well to the rest of my decor.

For the first woodworking project since I was in middle school in shop class, I think I did alright!

A tip though, get the size nails they suggest. Substituting longer and thicker ones was not much fun.

sofa

All in all, for about $20 I have a nice little functional bit of thready fun!
Quiver – Part 2

My unfinished quiver sat around for over a month between the first part and todays, but it was mostly because I was trying to determine the best way to sew it up.

I thought I could maybe butt up the two sides so they would form a solid point… My leather was just a bit too floppy for this.

I thought maybe I could fold under and sew it up like a seam. My leather had just too much structure.

And then it became the lace versus waxed thread debate. And where would I even attach the belt?

So I waffled.

initial

But I knew that my TARDIS belt was going to be made of leather, and I have a policy for leather goods and myself, that I am not allowed to cut into leather if I’m still working on a different piece. So I had to finish the quiver.

stitching

Using my trusty awl, I punched holes every 1/4 inch both up the seam line and around the bottom, since I knew I’d be attaching a cap to the bottom.

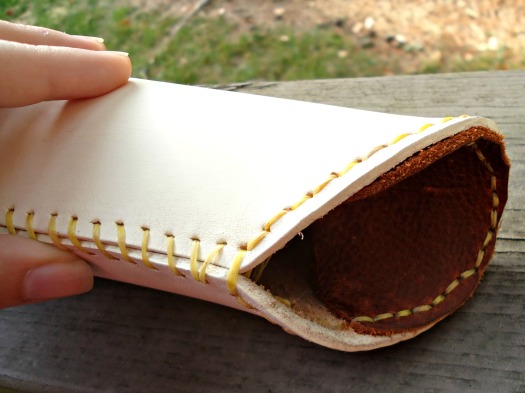
Waxed thread was my “weapon of choice” in the end. I used a whip stitch, I guess, to sew up the seam, which seemed to hold it very stably.

inside

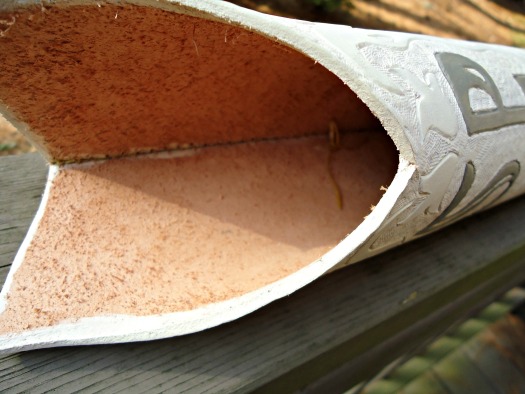
I had intentions of attaching the belt by running it through the quiver itself, but that didn’t pan out. For one, I only had as long as a partially used cow belly, which was not as long as I was expecting. Threading it through like that also made it really blocky and uncomfortable. Comfort is key in the costume game, especially since I’d already be wearing a corset, which is enough comfort-restraint.

top

So I ended up running a few loops of waxed threads to serve as attachments for the belt. It works well for now, but I’ll probably need to adjust it in the future.

Then I actually needed to make the belt.

belt

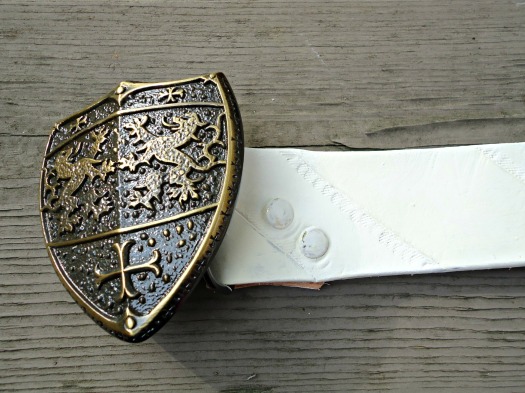
I wanted it to be something I could potentially wear, since I love the buckle so much. Isn’t it just the cutest shield ever? But I also knew the belt had to be long in order to cross my body like a messenger bag. So I made it as long as I could, and punched holes in various places, so I could wear it at my natural waist, or through jeans, or through the quiver. I cut a simple design using my swivel knife, just diagonal lines, and I tooled a few sections for some visual interest. It doesn’t show through the paint though, so I ended up painting a very subtle alteration between cream and ivory, based on my ability to mix paints well, which ended up with a more ivory batch right at the end of the painting cycle.

So that’s it for my quiver! Isn’t it purdy?

Quiver – Part 1

Even though Susan doesn’t actually wear her quiver with her final gown, it was still a must have prop for me.

Though it is very likely that the cosplay I see is not a full indication of people’s geeky interests, I’ve always thought that Narnia fans, of the movies more specifically, are more subdued (aka they don’t cosplay). There have been a few wonderful ones, but altogether the cosplay quantity is rather low.

tease

So the likelihood that I would be easily recognized from the costume alone (and with my hair, not a wig) is slim. I’m already risking the Lucy vs. Susan issue, with the red hair, but anything to make the costume more recognizable is good.

Plus I’ve always wanted a quiver for all the imaginary arrows I have.

The problem with Susan’s quiver is that it is likely meant to be ivory, or rather it was carved in one piece. There have been some good reproductions made with PVC pipe, but I didn’t have the requisite skill set. So I decided to use leather, something I do know a bit about.

I took pictures like this was a real tutorial, at least for this first half…  and then I let it sit for two months before I finished it. But that’s another story.

pattern

I started with posterboard, knowing that I had a limited amount of leather big enough to create this quiver. I drew a pattern, dragged a belt from the closet to “try it on” and fiddled with the pattern until it felt right. It slimmed down a bunch, and shortened as well, so that it would feel proportionally right on me.

Then came time to cut into the leather. I managed to find a big enough piece, and I used my rotary cutter to cut clean lines through… Leather is like fabric, right?

begintool

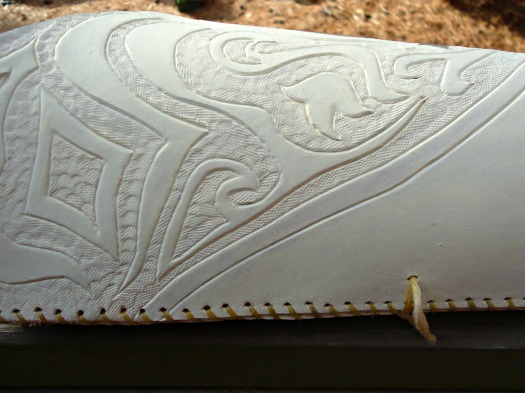
I had previously drawn designs for the top of the quiver, but they  didn’t precisely fit, so after some tweaking I got a useable pattern and traced it on. I cut into it with my swivel knife, and began tooling.

finishtool

And here it is with the design finalized!

The real quiver has a picture of Aslan carved in the bottom, but I didn’t want to take this that far.

So I began painting. I had both white and cream acrylic paint, neither of which was perfect, so I mixed the two and diluted with some water.

first

The first coat turned out streaky, and it ended up taking 4 coats before I was satisfied. In the tool-work, there’s still some areas of low paint, but I’m learning to give it up.

DSC03285

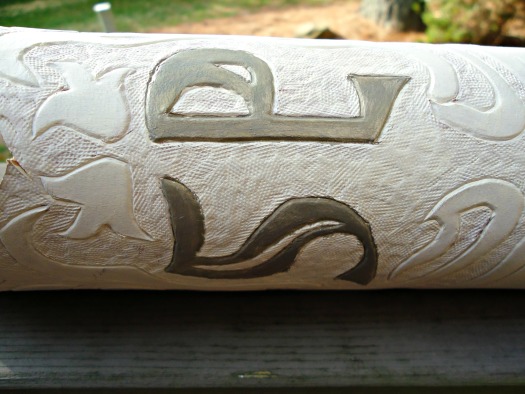
I then painted the initials with a grey and gold mix of paint (though technically it was a mix of cream, white, black, and gold), with the gold added in for a bit of sparkle… Not that its really visible, but it can be seen in real life.

Look out (hopefully) next week for part 2 of my quiver fun!

Baby Groot!

Happy Labor Day! If you’re not American, happy Monday! May I wish you a blues-free Monday!

There was no beating around the bush with this title today.

I made baby Groots and I’m so proud of them.

duo

Sculpey was the main ingredient. I used two different colors of brown Sculpey 3.

Other ingredients: Itsy bitsy clay pots, pins (i ended up using mostly T-pins), heavy-duty glue, paint, air dry clay, pin heads.

I got the clay and pots from AC Moore, and I had the other ones on hand.

prefront

Then I used the darker clay, which was honestly a bit too dark for Groot, and created the base layer. So basically just a tube of clay supported with pins.

Layering on thin ropes of clay, I created the rest of his body, then stuck pins in and wrapped other ropes around them for arms.

The head. This part took the longest. I started with a sphere of clay. Then I flattened and smushed and added and flattened and smushed. I took the heads off some black ball pins, and used them for eyes on the big version, while using small circles of the darker clay for the small version. For the “hair” I used lots of small ropes and stuck them on and blended.

pre

At this point, it was late at night, so I waited until the morning before I did the baking.

I actually baked the groots inside their individual clay pots, so they’d likely stay up, since my baking sheet doesn’t exactly lay flat in the oven. It’s just a smidgeon too big for the oven. I think the small one was cooked for 30 minutes, and the larger one for 45.

big

Paint the pots white, fill the interior with air-dry clay, glue Groot to the clay (once mostly dry), and you’re done!

Ta da!

littleThe little one is gracing the office of some geology graduate students and the bigger one is sitting proudly in my office!

Spoilers!

I got the River Song journal on the brain.

opening

Altoids have been a favorite for me, even before I had uses for the tins. I think I’ve had this one for years.

And now I have a reason to use it!

teenyIsn’t the swimming pool cute?

I’ve also been working on the leather outer.

cut leather

Here it is just cut from the hide, before I “squared” it off.

front

It got less square after tooling.

back

I skived off some of the back of the leather, and shaved some beveling into the edges.

Then I got to work dyeing it.

uprightI’ll let you know how it went next time!

Eyedrive

So… I had a moment of weakness.

I went to a friend’s Masquerade themed birthday party, but that wasn’t the weakness.

I knew I didn’t have a mask, and I forgot that my contacts hadn’t quite made it up to college with me… so a mask for this party was out.

But my fingers were still itching to wetform leather.made up

And… I made an eyedrive from Doctor Who

designFirst I designed and drew the eyedrive on the leather, and cut it out.

I tooled it slightly, in the “eyeball” region to give it a nice texture, then got it wet and began to wetform it to my eye.

Imagine a roommate coming into the apartment and seeing me blow-drying my eye.

cut out and tooledThen I realized that I had made the eyedrive fit the wrong eye. Oops!

But I didn’t want to give up. So I started painting.

black paint

First came the base layer of black.

Then I mixed in some gold and gave it a few more coats!

final

And voila!

frontI’ve attached it to my eye with tape loops, since I couldn’t figure out another way that didn’t involve it looking like a pirate’s eyepatch. I certainly wouldn’t recommend this method for anything but short term engagements. I was able to see out of it a bit though. Out the bottom and the sides, which felt weird.

More than just an oversized IPhone

This is my final wrap up post for my Altoids tin Farnsworth.

farnsworth - front


I’ve decided that for projects that span more than two posts, I want to give more of a real goodbye.

Both the projects and I deserve it, in my humble opinion.

Here are the links to each post, in order from inception to completion.

u17162wh1303x040066r103

Oh Farnsworth, my Farnsworth

farnsworth - dsc09302

Busy Bee

farnsworth - dsc09336

Elbow Grease

farnsworth - finished-squiggle

Loving the Fugue

farnsworth - left

I’m not laughing at you, I’m laughing with the horse

farnsworth - top

Proceed with the splaining.

The Farnsworth has fascinated me since I started to watch the show. I’m not actually a smartphone user, so at the time, it was really neat to have a communication device that was more face to face.

Yes, I know that there are apps like Facetime and Skype that will let you talk face to face, but I’m not quite up to date with technology.

Some of my thoughts on the construction:

Next time I want to make an altoids sized prop, I should weigh my choices better. If I’m going to cover the lid with something, like felt or paper, then an Altoids tin is fine, as the embossed lid will be covered. But if I’m just going to paint it, then I should find a tin without embossing.

It’s very neat that underneath the covering of the tin is a somewhat glossy coat. It didn’t even feel all that scratchy even with the sandpaper.

Rustoleum smells. But it does cover well, and I really enjoy the shiny coat from the glossy black paint. I do need to buy a few extra paint brushes next time. Or decide to do painting like this when I have a sink that is not white to wash the brush in. White porcelain and black paint don’t exactly work together. In my previous experience, at least. I decided not to wash out my one paintbrush, so each time I did a new coat the brush bristles were less and less bendable.

Wire requires proper tools to bend and work with it. I have bought some since, but I now definitely know that eyeglasses cases and nail clippers are not suitable.

Check the shipping address to make sure you aren’t sending your purchase to one of the other many addresses you may have on file. It happened to me… three times now. In the past month?

Realize in advance that cardboard is a wonderful substance, and though its not underappreciated, it should be acknowledged more often.

Glass can be quite heavy.baby-farnsworth.jpg

But all in all, the Farnsworth looks really good in my hand, and even in its diminutive state compared to show-accurate ones, I think its a pretty good build!

Onwards!

Proceed with the ‘splaining

Did Claudia’s Farnsworth not disintegrate in the penultimate episode of this season? And then reappear in the season finale?

farnsworth - front

Well, whatever happened, I’m finished my version.

farnsworth - lens

I received my lens yesterday, which nearly completed my prep.

I still had not managed to solve the problem of the combination lock, as I needed to see how big the lens would be within the tin before I could move on to cutting up the microphone tip and making a combination lock.

farnsworth - tools

There were a few circles of the microphone mesh, and a few ideas about the lock that circled through my head.

With a little work from my gold paint pen, I ended up using a rubber piece that I had cut off the microphone while I was taking it apart.

farnsworth - notebook cover2

The plan came together quite quickly last night.

farnsworth - notebook cover


First the cutting out of the black plastic piece. I had the cover from an old black Fivestar notebook handy, which I use to keep wall decals safe as I travel to and from dorms and college and such.

fansworth - mic cut

I had some extra space in the bottom of the tin that I could raise the plate structure up, so it looked more 3-d and still manage to close. I did this with a few layers of cardboard. I had to cut out a space for the wire mesh, though, so it would sit flush with the cardboard surface.

Then I cut out the circle to reveal the wire mesh, and glued on the “tuner.”

farnsworth - lens glue

The lens needed to be glued to some paper, to give it that blank screen look.

The assembly continued, and all pieces were glued together with super glue, which currently is my only adhesive option.

farnsworth - top

And I got my finished product! Do you like it?

farnsworthleft1

Edited: As of right now this is the end of this project. Follow it from its inception, to further planning, to sanding and painting, to the wirework, to the gold detailing, to (this) the gluing of all the components together.

I’m not laughing at you, I’m laughing with the horse.

So I’m continuing work on my Farnsworth as I’m waiting for my new serger to decide it wants to sew.

If I have the option of not handsewing, I’ll avoid it.

With very few exceptions.

So I got the wires all glued in, though I’m not sure how permanent the super glue will end up being.

We’ll see!

farnsworth - left

I received my gold paint pen, and almost immediately got to work on some detail work.

farnsworth - full

The handwriting inside is a little too off center for my liking, but it will do for this project. If I ever redo the Farnsworth, I’ll be a little more exact and a bit more careful.

farnsworth - mic

Feel free to ignore my artsy photography choice above. I’m working on it.

Also I took apart a broken microphone, and will be using the microphone wire mesh for the same basic purpose on my version.

I just need to figure out how to cut it.

Perhaps I need some wire cutters.

Edited: As of right now this project is finished. Follow it from its inception, to further planning, to sanding and painting, to the wirework, to (this) the gold detailing, to the gluing of all the components together.

Loving the Fugue

I’d certainly not want to clean out the Warehouse’s neutralizer annex.

My first coat of paint is complete!

farnsworth - dsc09354


Yesterday I had completed the coat on the outside of the tin, and today I painted the inside.

farnsworth - wire

Here’s the wire that I had bought to imitate the squiggle pattern on the left side of the Farnsworth.

u17162wh1303x040066r103link

Did you know there are 13 of those squiggles? I thought it was clever.

farnsworth - cutting-implements

I did my best to straighten the wire out, and then I clipped a piece off. I don’t have my wire cutters on hand at the moment, so I grabbed my scissors and tried my best. Then that didn’t work out, so I brought out a trusty craft knife (which I was super careful with, by the way). Still needing something stronger, I used my nail clippers, which did the trick with some bending at the connection point.

I managed to get the plastic coating off of the wire with the craft knife, and started bending. I ended up using a glasses case for some leverage.

farnsworth - bending

I’m only using seven squiggles because my wire is thicker than I had thought, and this many provides the right aesthetic appeal.

farnsworth - finished-squiggle

If the paint was dry enough, I would have arranged them on the tin for you, but unfortunately its still a bit wet.

I still haven’t quite decided how I’m going to imitate the tube from side to side and the rubber washer like thing, but I will be working on that.

Edited: As of right now this project is finished. Follow it from its inception, to further planning, to sanding and painting, to (this) the wirework, to the gold detailing, to the gluing of all the components together.