Alanna the Lioness

Happy Halloween everyone!

start

Let me start by telling you a story of young Jess…

Once upon a time, there was a house down the road that was for rent, the only house in the neighborhood that was. This house throughout the years contained some of Jess’s most unusual friends, but most of that is fodder for another time.

One year a family moved in with two kids, and one of them was Alison. Alison was three years older, and had done and read so many more things, but still wanted to be friends with Jess (even though in elementary school years three years is a decade). She introduced Jess to Tamora Pierce’s books on Halloween (by dressing up as Alanna, if I remember correctly). And changed her life.

The Song of the Lioness quartet was not the first I read… I think Kel was first since I was closer to her age, then Daine, but the character that I got attached to deeply was Alanna.

pullingsword

She’s a warrior who’s also magical and has a cat who’s also a bit of a god… and she goes on cool adventures in far off lands… And I was a quiet kid that cried a lot and got bullied to varying degrees emotionally, to the point that I’m pretty sure some of it was imagined (which is essentially me bullying myself). Reading all of Tamora Pierce, but especially Alanna, got me through my child and teen-hood.

doesthisposemakemelookfierce

So I decided to show this love as a costume.

As with many of my costumes, I looked to make part of it so I could wear it in real life, which were the trousers I showed you last week. They’re on heavy rotation…


And I teased my prop sword and shield as well, though those aren’t real life applicable.

But I realized that I will not be able to use much more of this costume in my real life, so when I recognised it I felt free to just make. It also helps that the shirt fabric and all the bias tape was in my stash. The red linen was a purchase from Joann’s.

Both the shirt and the tunic are based on the Onyx top by Paprika Patterns (yay for TNTs!).

shirt

For the shirt, I added length to the sleeves and added cuffs, and raised the neckline plus added a “v” split for easy pulling on and off. The neckline is finished with yellow-gold bias tape, which was mostly applied by hand (because I didn’t have any matching thread. And didn’t want to buy more). Lots of pick stitching.

The sleeves were just lengthened straight from the armpit down, so I could get some volume at the cuffs, which I mostly just eyeballed. To match the cuff width with the sleeve width I pleated in the sleeve volume. The buttons… the buttons don’t work. I put snaps on the inside, and the buttons on the outside… Just in case I couldn’t actually button the cuffs myself. So… Convenience?

tunic

The tunic was basically the original top, just sleeveless and with the neckline raised a smidge. I lengthened the top until it hit “somewhere between hips and knees” but left slits on either side so I could get to my pockets (highly important at a con) and for movement.

patch

I used an embroidery machine to make a patch for the “breast pocket” area, which was so fun to watch. I love watching needles stab into the fabric… Maybe that’s too much.

Two more finishing touches rounded off the costume: the ember stone and Faithful.

ember

I’ve carried around this pendant for years and years now, not really sure what I wanted to use it for, so it was just something fun that I was able to incorporate.

And finally, Faithful. My companion. He is the reason why I was recognized, most of all. And no one was able to tell that his eyes were purple!

Faithful

First I bought this plushie once I realized I didn’t have the time or bandwidth to make a realistic cat. I made him a little “platform” out of denim and a mustard fabric, which I would then safety pin to my tunic. Then I put wire up his leg and tail so it would stay up. And then I painted his eyes so the irises would be purple, which mildly worked. Not well, but if you’re looking for it.

shieldup

And that’s my ode to Alanna. It’s been a long time coming, but I think this is the best time for me to portray her. I need a little of her spunk in my life right now.

(On a semi-related note, Sara Bareilles released a new song recently, and I have been listening to it on repeat.)

((Also, if you really like Tamora Pierce’s Tortall universe, but want to hear a discussion about it from a group of well read friends who are picking it apart from a 2017/2018 point of view, I’d highly suggest listening to the Tortall Recall podcast. While I don’t always agree with their takes, it’s fun and sometimes enlightening to listen to people discuss some of my favorite books in new to me ways. I’m not affiliated with them in any way, I just enjoy listening to them!))

alanna.jpg

Not a Background Lannister – Prop Shield Tutorial

first

So I started with the trousers last Wednesday… The shield on Friday… Next up in the lead up to the costume reveal is the shield.

And boy am I proud of it!

I have access to a laser cutter, at my job, so I put together a “quick” file (it’s never quick) for a shield that would fit on one piece of plywood. I could’ve made a bigger one, but I was trying to be material conscious, and I’m glad I kept it at that size. The laser in question is technically two feet “wide” in material dimensions, and 4 feet long, but it’s a little bit smaller in both directions due to crookedness and use  over time.

I worked with 1/8″ plywood, and made this as solid looking, but light as possible. There are two fully solid pieces, with multiple border pieces, one set in between the solid pieces, and two sets on the front, and then the decorative pieces there too… This would be better explained in pictures…

alanna_pullapart

Yeah… Like that.

So I layered and glued everything together. It took awhile. What I should have done then, is sand those edges. I didn’t. Moving on.

edge

On the top of the shield I used wood filler and a putty knife to shove material into the seams so it was a fake beveled/routed edge. That’s honestly what took the longest. I’d put on wood filler, wait for it to dry, sand it, apply more when it inevitably chipped and repeat.

bevel
Yeah… not meant to see it up close.

I’m kicking myself that I didn’t get progress pictures as I went. So then I painted the shield. Chestnut brown on the back and sides, then red and gold on the front. The gold is Bright Gold Lumiere Jacquard fabric/universal paint, and the others are stash cheapo acrylic paints. Oh, I so love the Lumiere paints.

lioness
Gaah. I’m gonna stop it (mostly) with the close ups on this one.

On the back are two more sets of laser cut pieces, the main point of which was to provide some material for screws to connect to. Then I guesstimated sizes of leather to attach the shield to my arm, screwed it into the top and bottom bracers. I had to reattach the bottom ones to make them tighter so I could control the shield a bit better, but then I was completely done with the shield!

Lightweight, blocky and just what I needed.

It did mean that I hit a bunch of people accidentally, but… that’s being at a con, right?

I was not too surprised that this wasn’t the recognizable part of the costume (It looks too much like the Lannister crest, or Peter’s from Chronicles of Narnia), but I was surprised what was! You’ll have to tune in on Wednesday to figure out what I’m talking about!

corner

That probably sounded like a ending, but I’m popping back in again to say that though I made this with a laser cutter out of plywood, you could totally do something like this with a craft knife and some stiff foamboard or foam, and come out with similarly awesome results!

Is the pen really mightier? – Prop Sword Tutorial

first

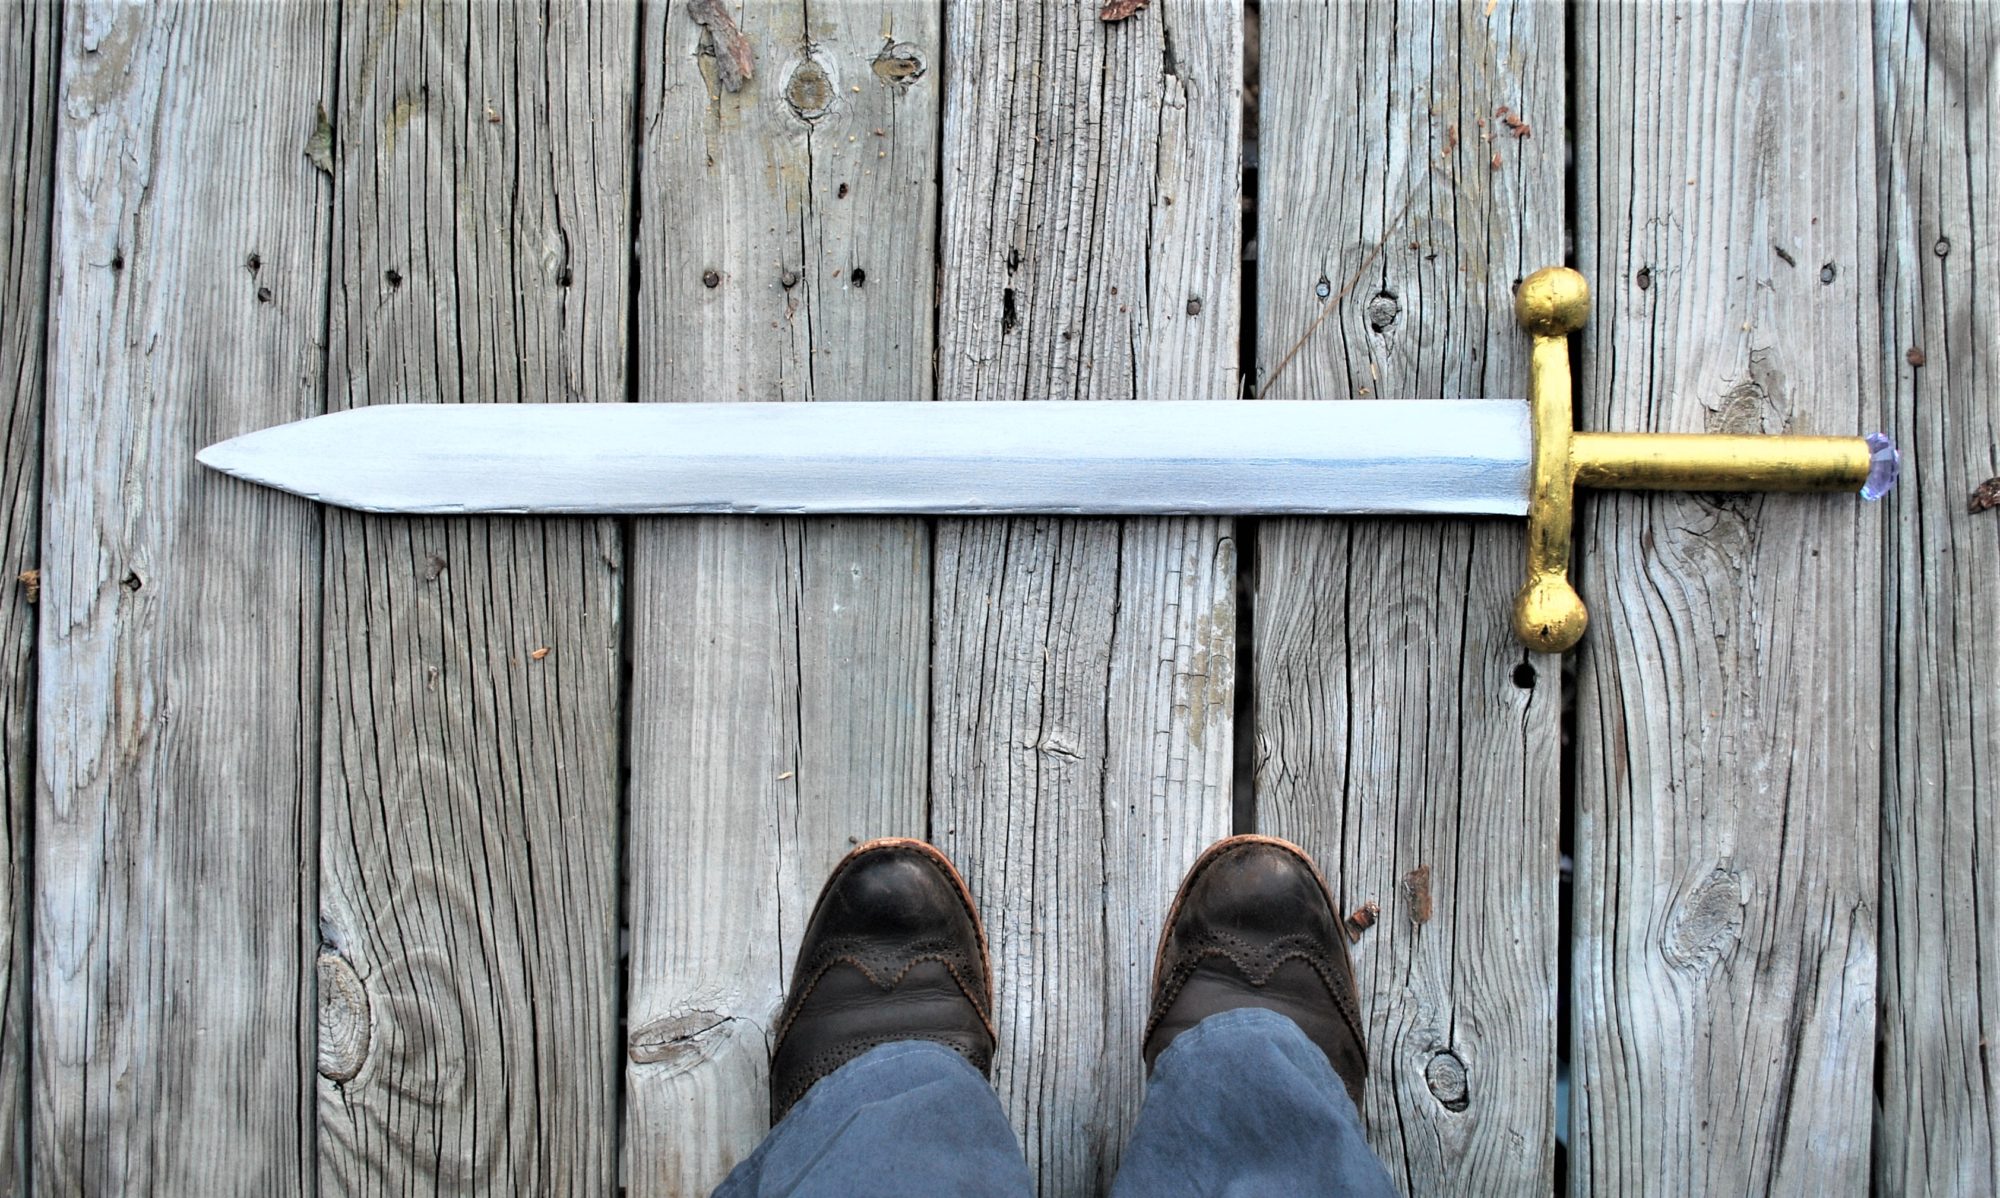
The first prop I needed to make was a lightweight sword. It had to be a short sword (so the double handed sword I bought at my first DC was out) and it had to be me-sized. So smaller.

full

I went to Michael’s one day to scope out the small plywood situation, and ended up with Basswood, I think with the dimensions 24″ by 4″ by either an 1/8 or 1/16″ but I’m not sure which. I also purchased an 1/8″ diameter dowel, which gave the sword it’s structure. That was the cheapest Michael’s trip ever, because with a coupon, the main part of the sword cost $2.50. Craft stores never work out that well for me, so I definitely gave myself a pat on the back for a good job. Or rather, I took myself out to see the Incredibles 2 (this was late July/early August. It was still in theaters.

I’m pretty sure I cut the basswood in half lengthwise, then I cut the pointy bit out, and tried to match on both sides. Most of this was done at night, so cue the bad phone pic here:

DSC_6980

I then taped the dowel to one of the sword pieces. Then I applied wood glue around the edge of the sword outline, and used every single clamp and binder clip I own to keep the pieces together.

DSC_6986

Then I left it for a few days, even though it probably only needed one.

I used a laser cutter to cut out pieces for the hilt from 1/8″ plywood that would slide onto the wooden dowel for stability, and I aimed for a hand and a half length. In the end I got a stacked result, then used wood filler to fill it in and round it slightly. It worked pretty well, though it might’ve worked better if my filler was wetter. It has gotten rather gummy over time. Regardless there was a lot of back and forth between gooping and sanding. Using cardboard would work pretty much just the same way, if you cut some layers and used wood filler and glue and tape to hide the corrugated edges!

hilt.jpg

Then came painting and sanding. I painted up the “blade” with white acrylic first, then with Lumiere Jacquard paint in silver. Then it was too shiny, so I sanded it. Repeat once more to see if anything changed. Add the line down the center (kinda… don’t look too close) and then sand again to blend that in.

For the hilt I first painted everything brown, then painted it with Lumiere Jacquard paint in bright gold.

jewel.jpg

And the jewel. Still the biggest pain in the butt of this project. When I was designing the laser cut part of the hilt I made pieces for the end that would allow the jewel to nestle in.

Then I tried hot glue, then superglue twice, and now E6000. It’s sticking for now.

point.jpg

So that’s how I made my prop lightweight sword!

Stormy Grey Flint Trousers

grey flint - frontsmile

As of yet, the only garments I’ve made from the Flint trouser pattern by Megan Nielsen have been grey… Like flint.

Coincidence? Yeah. Funny? Probably only to me.

I’ve found myself lacking interest in fabric shopping. **gasp** When I have something to make and already know what kind of fabric I want to use, it won’t be at the (big chain) fabric store when I need it, and the hours at my (more expensive) local fabric store are inconvenient now.

grey flint - wide

But since i know how to dye fabric I’m choosing that option more and more!

For fabric i used this linen cotton blend from Dharma Trading and used their fiber reactive dye in 150 GUN METAL GRAY.

grey flint - sidewide

I bought 6 yards of the fabric for my stash, and probably used just over 2 yards for these trousers. Then came the evening when I spent two hours leaning over the tub and the paint bucket I use to dye the fabric. When the fabric came out of the bucket I was convinced I let it sit too long since it was almost black, but after putting it through the wash it turned up as this lovely stormy charcoal blue grey.

grey flint - pocketses

As for the pattern, I made a few alterations. First the same ones that I used for the shorts I made last year, cutting out about two inches from the rise. Then I lengthened it to full length by adding about 8 inches to the hem.

grey flint - front

I interrupt this broadcast to remind you that this is a linen cotton blend. This is to say, naturally relatively wrinkly, and also this is the third wear since it was last washed, and although it’s been hung up in between, that doesn’t mean it wasn’t being wrinkled… It happens. This public service announcement has been brought to you by “Jess just looked through the pictures for this post and grew concerned for her sanity.”

grey flint - back

I was banking on the hopes that the weird crotch and butt wrinkles I got with the shorts would be smoothed by the weight of the extra fabric. I think I was mostly right. There’s a bit of room for improvement there. I’m pretty sure I made a curved waistband.

When the trousers came together, though, the waistband still needed to be taken in, like with the shorts.

grey flint - buttons

I found these really cool plastic buttons in my stash, and I’m pretty sure they were bought in NYC at one of the shops that specializes in notions.

grey flint - bias binding
Can we pretend you don’t see any loose threads?

Oh, and did I forget to mention that I bound every seam with bias binding? I want these suckers to last!

Swishing around in these makes me so happy!

grey flint - neighbors

Soon, I’ll share what costume these trousers were made for!

Diving Deep Shawl

This might be one of the quickest yarn-buying to final project finishes that I’ve had so far…

wings.jpg

I bought the yarn in January from Me & Ewe in Austin TX as part of my “buy yarn/fabric as souvenirs” initiative to help me stop buying stupid trinkets I don’t need and instead come out with things I’ll treasure. My backpack from last year’s fabric purchase is most definitely my most used item in my life.

It’s a fine single ply yarn that is a merino wool and silk blend from a spinner in Texas. The colors remind me of a tropical ocean under moonlight, or rather what I think that would look like.

spread

Then I got into a stage of my home life (at the time) where I realized that I couldn’t accommodate nearly every craft I’m fond of in my tiny hole of a room (only slightly bigger than a walk in closet) except for yarncrafts, which had easily accessible supplies and very little footprint.

back

So I got to searching Ravelry, bought this excellent pattern called Pearla Beaded Lace Shawl (though I chose not to bead it) from ByTheLilyPond.com, though I did purchase it on Ravelry.

I found it a pretty quick knit, and very intuitive to knit after a bit. I knit it all from looking at a computer, moving a rectangle around in Adobe Acrobat and scribbling a small key on the page so I wouldn’t have to continually scroll up and down, which made it easy to knit wherever I was. I’d most definitely make this shawl again, and I’ll consider it for the next time I go to a new place and buy yarn!

hemi

And I finished in early April. Between it and my NOLA Shawl I can wear a shawl with pretty much any item of clothing. Which is great! I love unusual accessories!

frontwrapped

Ocean Waves Purse

front3.jpg

Purses have not often been my thing. I’ll carry them, find a perfect one for that month or year, and then drop them.

The closest to perfect I’ve come is a small leather purse that I bought for 17 euros from an Aldi near Duesseldorf about 10 years ago. I still have it. But this purse was made in the beginning of the smartphone, and does not have enough room for both a phone and a wallet. No matter what the size of the wallet. And forget about keys.

inside

So I set off to make one that would fit the things I might need on a day out when I don’t . I listed the things I needed to fit: keys, wallet, phone. Then things I’d like to bring: a notebook, pouch of markers, maybe my ballroom dance heels. That last one’s a stretch.

front2

I then did far too much research on making a leather purse, and ended up finding this Russian tutorial, which has a pretty clear procedure, and a reasonable looking pattern. I did end up altering the pattern, to make the purse a bit larger and make the front flap larger so it falls closed better, and I put a different pattern on the front, but overall I followed the general step by step.

flap

A game changer for me was to put tape on the suedey side of the leather, so it won’t stretch out when you shape it.

I made this out of nearly all of the leather bellies I’ve got left. Those were carried around with me for about two moves since I last used them, so it was time to get them cut up. I might have just enough to squeak out a strap, but I don’t have the hardware, so I haven’t checked into it.

skive

After the cuts were made, I skived all of the pieces thinner, by about 25%, and also the edges to make it easier to turn them. It did make the inside nice and somewhat even, and less shaggy, but only a little.

top

Then I brought the entire project into my workplace (on a weekend when we were closed) and dampened and stamped the leather for 9 hours… So many hours. Lots of tv while I was waiting for leather to dry just enough to stamp. Lots of punching holes. So many holes.

front

If you don’t know (though I’ve probably said it enough), I got my master’s in marine physics, so I did learn a lot about ocean waves… Most waves do not look like this, but I’m totally okay with it. I know better and I’m ignoring it.Cool?

Cool.

ring

Then I used some wax threads to sew it together, and then also fastened it with suede leather lacing. There’s D rings for the top of the purse to attach the straps, and it used to have a bar at the bottom of the front to hold the flap down, but it broke. Probably never going to fix it, if we’re being honest.

inside2

And then I took some yarn and the remaining leather lacing to braid together a temporary strap. That may turn out semi-permanent.

I coated it with some weatherproofing wax that I used on the belts I made waaaaaaaaay back in the blog.

lasercut

Ooh, and then there was the little bit of laser cutting I did on the back. I had designed the initials a few months ago, and I sometimes bring them out and use them. Inevitably I’ll have the discussion about who K is, but I know that it says JS, even if no one else does.

back

And that’s that!

Sewing Journal – Shop Update

I started using a bullet journal is 2016, I think. And some of the pages are simple, like my log of savings and investment account tallies, and some are more complicated, like anything related to DragonCons.

patterns.jpg

After getting the basic setup, I was thinking of what pages I could add, and there were a lot, but one of the first was a log of what sewing patterns I already owned, both clothing and other. Later I figured out that I don’t have any non-garment patterns, that I can find at least. It’ll be my overflow, when I get that many patterns.

sketches

Sometimes I’ll use my bujo for sketching as well, like in this Summer Sewing and Knitting Plan. Was I super ambitious with this? Yes. Was it created about two weeks before I realized I had to get my butt in gear for DragonCon? Yes. Am I happy that at least 2 of these are complete? Absolutely.

alterations

One of the earlier pages was just a simple list of alterations that I needed to make, since I’m firmly in camp “fix it and only get rid of it if you can’t love it” but also camp “put it in a corner until you feel like dealing with it.” Writing it down makes it more real for me.

I’m not good at keeping up with daily, monthly, or even irregular logs, though. I get about 5 month spurts of bujo usage and then it gets shelved for a few months. I’m about to give my bujo another go, but I decided to keep my sewing stuff separate this go around.

So I needed a sewing journal! I started with the pages I knew I needed, so I made ones to match those above (these are now called “Sewing Patterns I Own” and “Sketches” and “Alterations to Make”), as well as some for fabrics, and some for projects.

fullplanner

Here’s the official list of pages:

Customizable title page where you can write in your name
Title page that simply states “My Sewing Journal” (because you know who you are!)
Sewing Patterns I Own
Sewing Patterns I Want
Specific pattern notes
Specific pattern notes with lines
Index for fabric (20 lines)
Index for notions
Fabric description page with room for type, color, quantity and description for three fabrics per page
Fabric description page with room for the above and a 2” square swatch for three fabrics per page
Measurements. We need them, so here’s a page.
Planning page for organizing six projects with fabric and patterns
Specific project page for making plans and notes
Specific project page for making plans and notes with lines
Alterations page for cataloguing six alterations to make
Mood board page
Sketches page

titlepageprojectpages2projectpagespatternpagesmeasuringfabric indexfabricpages

The file is designed for letter sized paper, since I live in the US, but if I were going to paste these pages into a notebook, I’d probably shrink them in the printer menu to a smaller size and cut them with scissors. It’s crossed my mind to do that, but for now it makes sense to me to keep it in my filing cabinet, since I’ve got the space.

So if this is something you’re interested in printing and using yourself, check it out at this link, and you can find the rest of my Etsy shop here!

(I am thinking about making one for yarnstuffs, since I also have a bit of a yarn hoarding problem… Let me know if you’re interested!)

Do you like coloring?

I’ve embraced coloring recently…

day2.JPG

And by recently, I mean I’ve been doodling for my entire life, but mostly in black ink on white paper. To the point that I tried to bring myself to buy a white gel pen, or paint pen, or something to draw in this black paper notebook I’ve been carrying around for 4.5 years. And it didn’t work.

(I’m only a low grade hoarder, I promise.)

IMG_20170523_172310.jpg

But I’ve been drawing mandalas specifically for laser cutting, because there’s something so cool about lasers, and sometimes I found myself coloring them in, both digitally and . So when I was having a mid-20s crisis (I know, it’s ridiculous, and I won’t dwell on it) I started an Etsy shop for coloring pages of my mandala art.

All of the products as of right now are digital downloads as PDF files, so they will either be emailed to you or they’ll live in your Etsy account. You do need a PDF reader for them, but I think most readers of blogs probably already have that…For almost all the products, there are both letter and A4 sized pdf pages, though you can always use your pdf reader’s print page to resize things.

So there’s coloring pages, since that was the original idea, and with both letter size and A4 size there are downloads for black lines and for grey lines, because some people like the lines to fade into the background.

Also I’ve been digitally coloring some of the mandalas, so I’ve released some print-at-home art prints that have already been colored in. Wow, print-at-home art prints is a mouthful, even typing it.

I’ve expanded a bit into calendar and planner pages more reminiscent of bullet journals, like spending logs, since that’s something I’ve dabbled in. I’m not good at keeping any kind of log long term, but everything I put up for sale is something I do or did use.

fullplanner.jpg

For instance, my newest offering is a sewing journal, which is a printable version of pages that I was already using in my bullet journal. I’m going to do a separate post on that later this week, because I know that a lot of you guys, my followers, are sewists so it might be something you’re interested in.

Really really long time subscribers might remember me talking about my old Etsy shop, which was a handmade beadwoven jewelry shop, and at least for the moment I have no plans to reopen it. I still have all my stock, but I have yet to feel the pull of jewelry making that would prompt me to reopen it. Maybe in a few months I’ll try to sell off my stock in this new shop, but for the moment I’m keeping it simple.

I’d be honored if you gave the new shop a look! I opened it about a month and a week ago, so though it’s not super new it’s still a little shiny for me. I’m going to go give it another shine…

Welcome to my new home!

And welcome to my first post on the new blog!

birthday2018-5

As the name suggests, I’m Jessica, though I go by Jess to my friends (and we’re friends here, right?), and I create things.

If you were around with me a few years ago, you might remember “Design Donnerstag” which was partly my attempt to post more and partly the beginning of my tshirt design phase.

Well, I’ve been expanding my design skills and changed (at least a little) my style, and I’ve been making mandalas and doodle designs of late, and decided to try building an Etsy shop with digital downloads based on this idea. It’s a newborn at the moment but I’m hoping to grow it into a thriving adult… I need a better metaphor for this. Right now I’m trying coloring pages, printable art, and planning pages; maybe I’ll branch out from that when I get my feet on the ground further.

I’m also going to try posting here once a week. I’ve said variations of this before, but I’m hoping it’ll stick this time. The old blog had mostly become a sewing log, and I’m hoping to branch out to posting more variety, from the different crafts I do to different kinds of posts. I’ll be experimenting a bit.

There are also some updates to make on old pages, as well as making some costume breakdowns and maybe tutorials (?!?) or walkthroughs on some things I’ve made to help my fellow makers.

Hope to see you all on the ride!

Big Changes Coming Soon…

Hey all!

I’m currently working on a few big projects, namely creating a new website and hopefully an Etsy business, as well as a couple new costumes in time for Dragon Con.

As soon as this is published, I’ll be back to trying to figure out how to migrate this blog over to the new website, but with a key difference.

Annabelle’s Project Overload has been my baby for the past few years, but I have a confession that early followers may remember. My name isn’t truly Annabelle Smith, but rather Jessica Smith.

I’ve always felt that my given name melts into the background, as its reasonably common, and for a while I wanted to have a more uncommon (but not suspiciously so) name, so my alter ego of Annabelle materialized.

But I’ve reached a point in my real life career at which a website is advantageous, and having my real name on it is important. I don’t want to split my life in half, however, so I’m working on incorporating the posts I’ve lovingly crafted here into my new venture.

Honestly, I don’t know what this means for you, dear reader (too much?), but if you’re interested in following me to my new site, stay tuned and I’ll keep you posted. Those of you who follow me on Tumblr, I’m equally confused what’s going to happen there too, but I’m adding it to the list!

Have a lovely weekend, and I’ll see you (hopefully) on the other side!