TARDIS Blouse

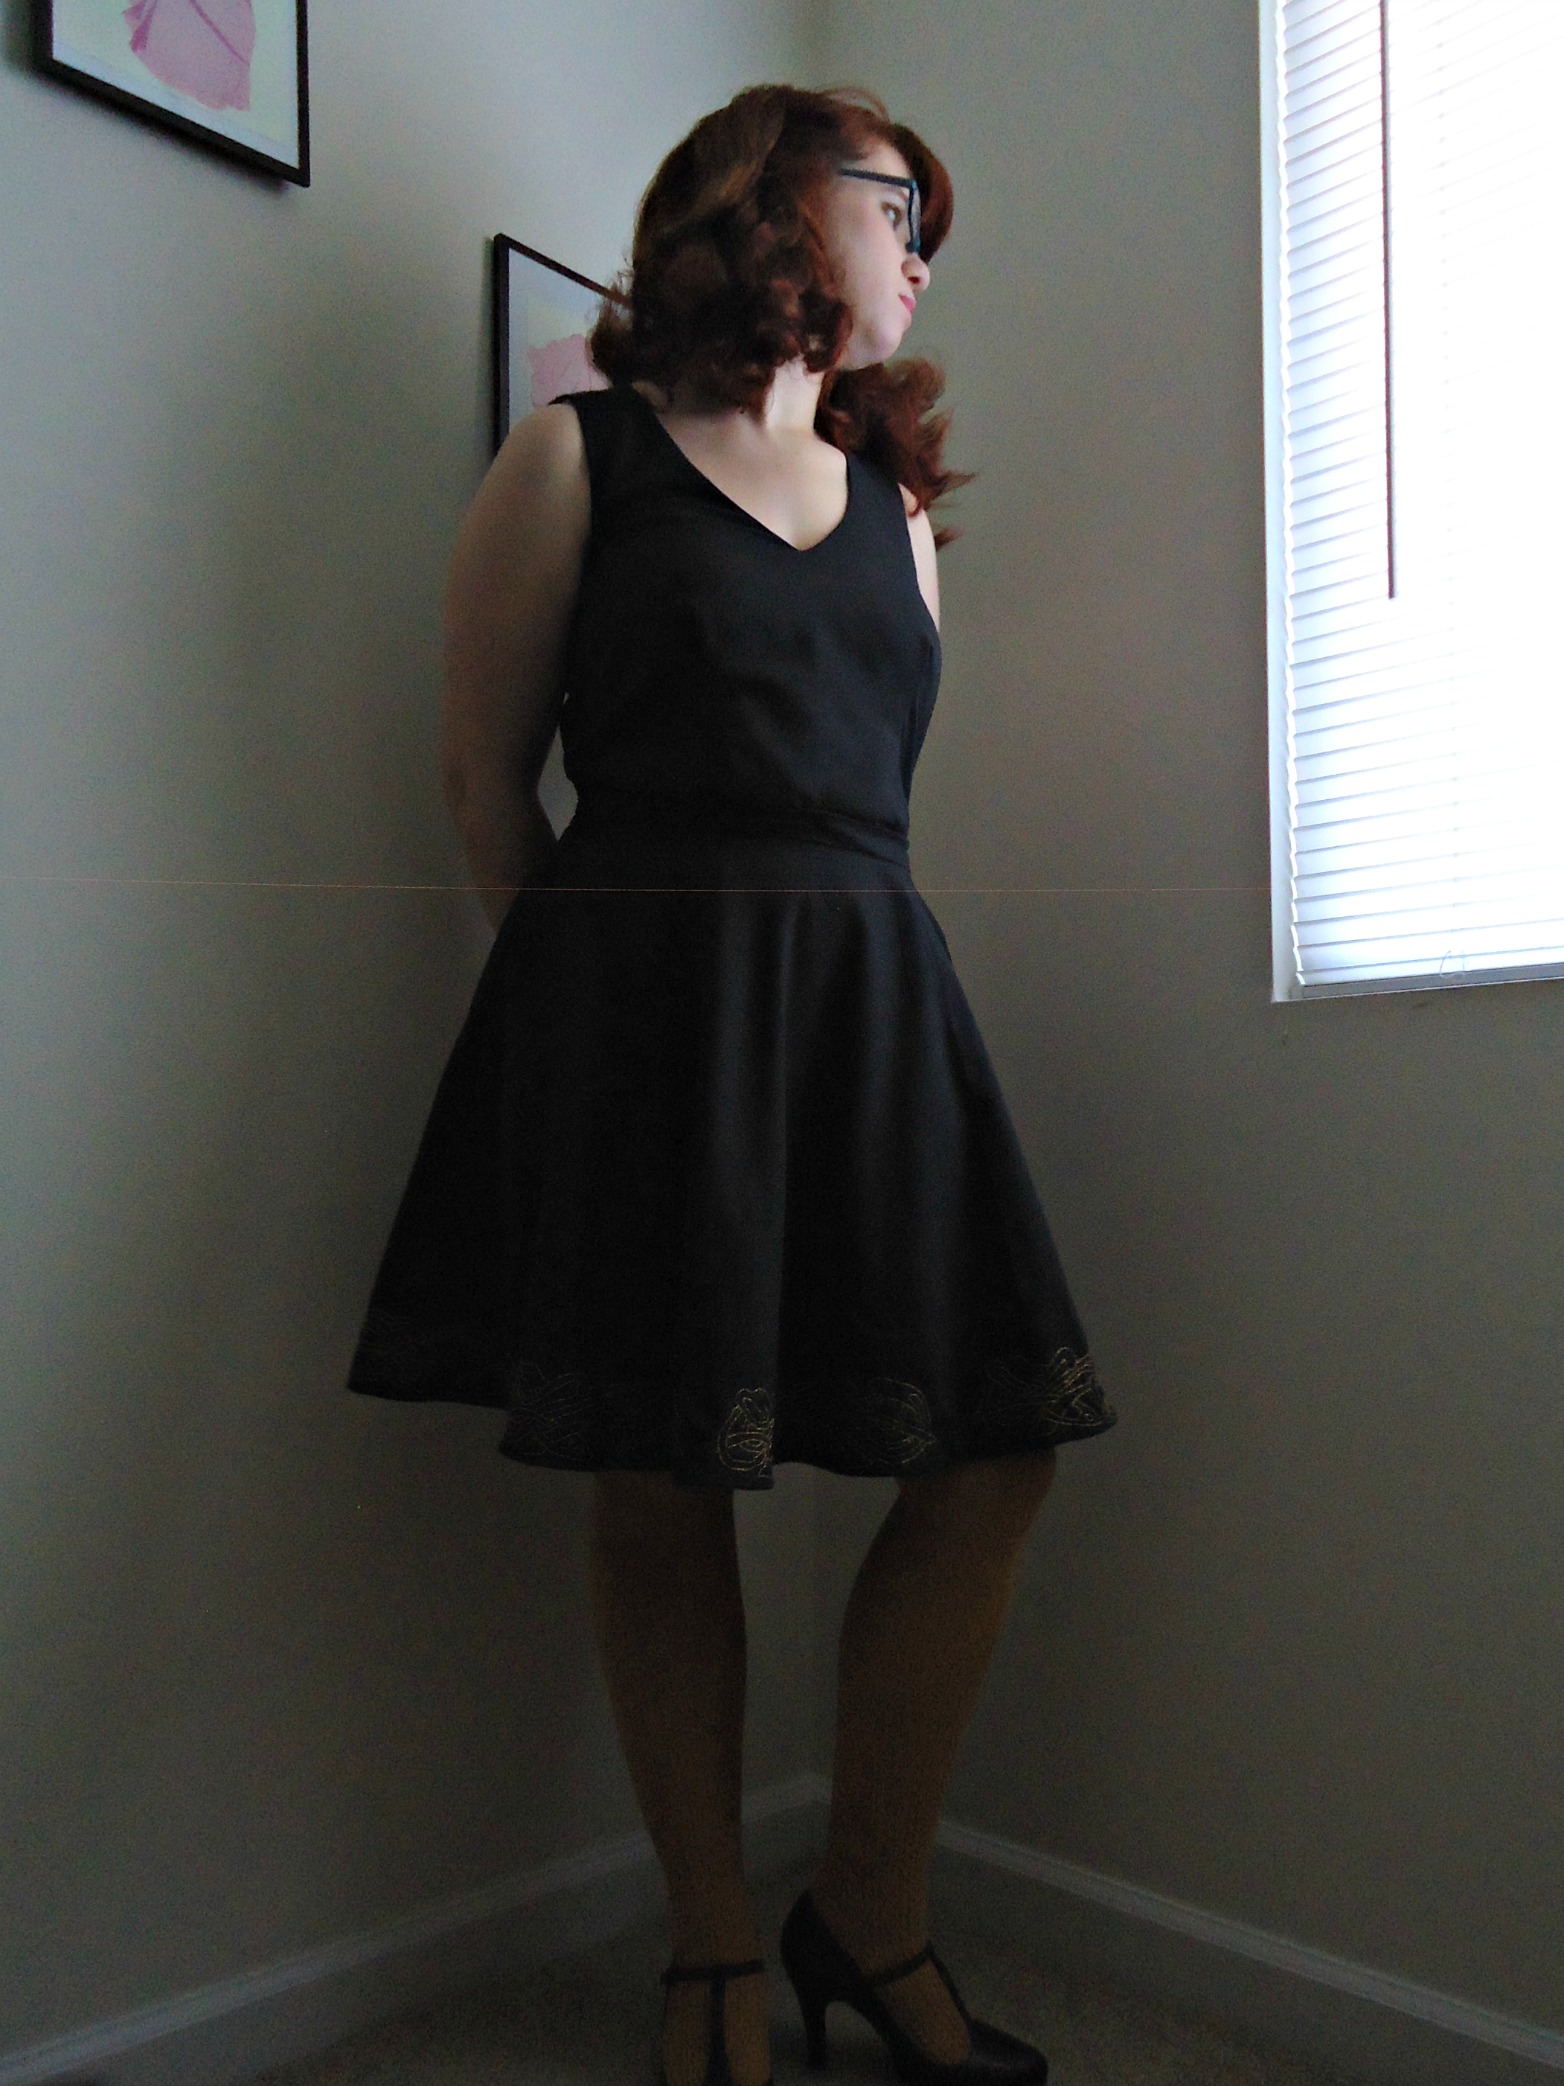
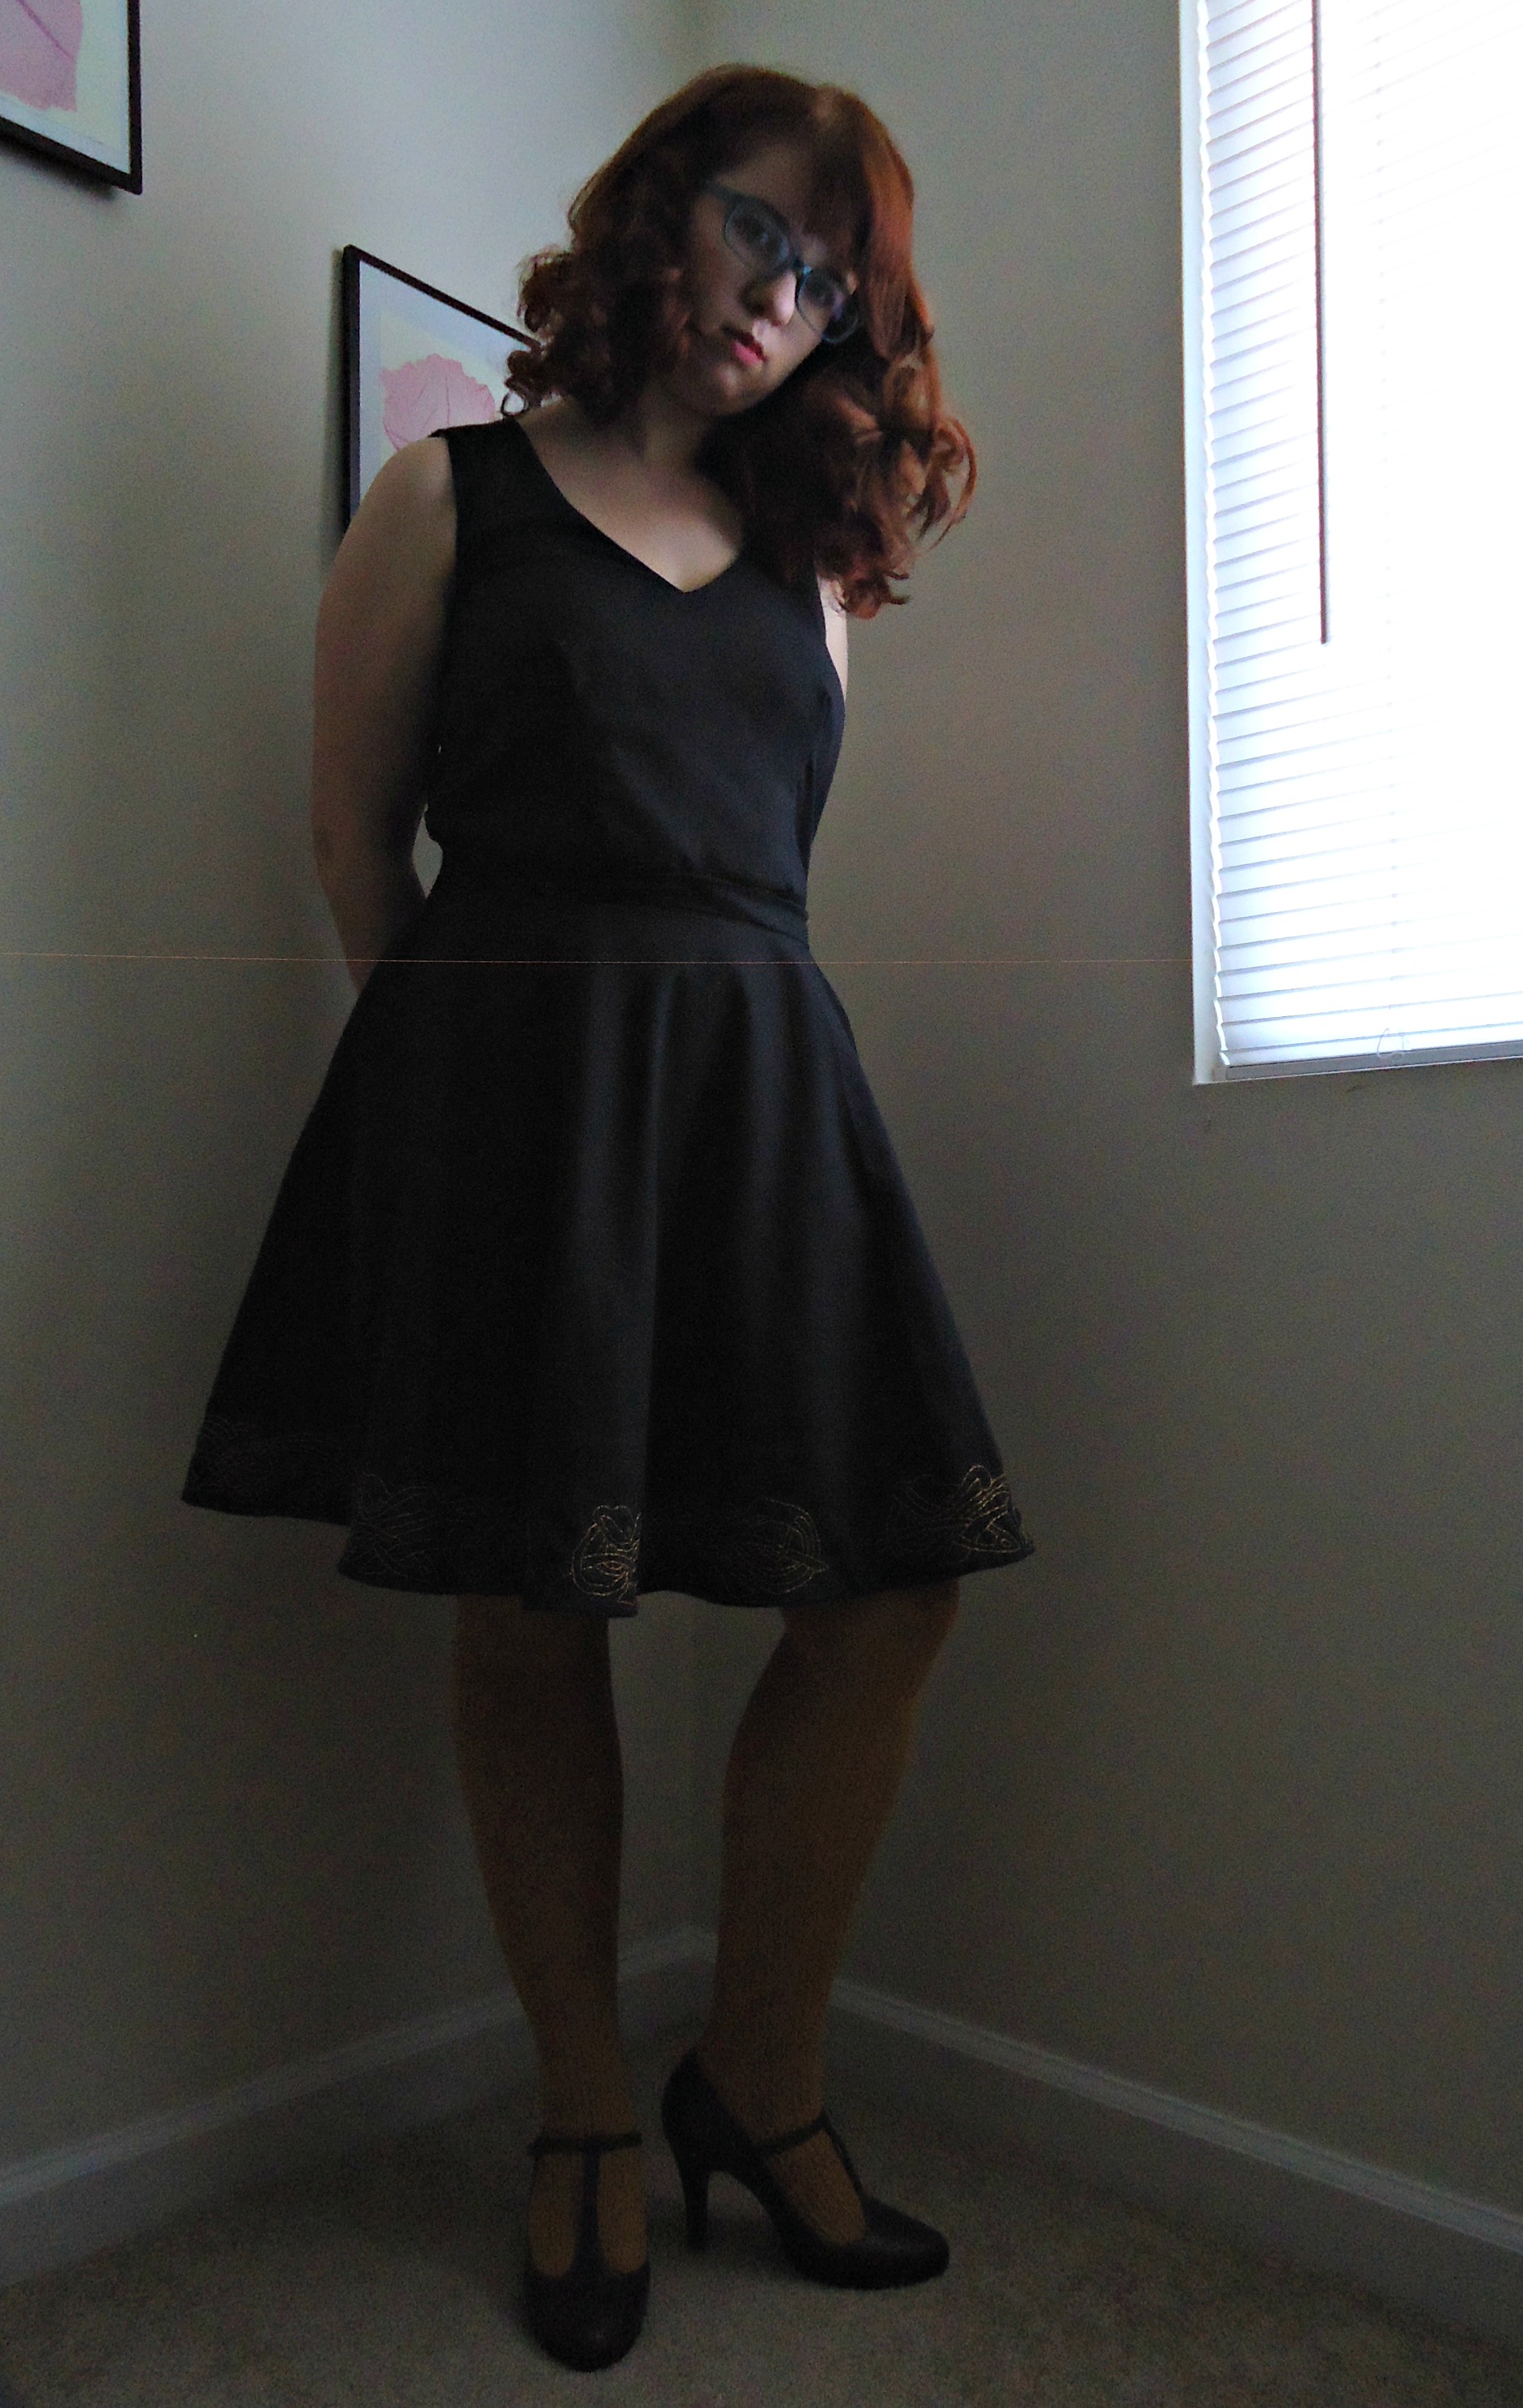
The final new piece of my TARDIS puzzle, the blouse, was a rush job.

full

I’m talking the day before I left on a trip that I’d be also using for my first photoshoot of the costume, when I realized that the shirt I had planned on using looks crappy with the jacket. And I can’t really change the jacket, since it’s lined and I love it.

hung

It also occurred to me that because I’m not necessarily stuck in a summer con that I can wear long sleeves. So I did, and I think it helps balance out some of the elements.

I used the pattern I made for my Peggy costume, which is quickly becoming my favorite close fitting button up pattern (also known as my only close fitting button up pattern).

back

The back needed to be redrafted so it was a single piece with no gathering, and I removed some of the curve that is meant to help with swayback, since this would be worn over a corset and was short enough not to really effect it.

The front was redrafted for a shawl collar, which would start its separation above I also decided that long diagonal darts would be neat for a change to the front. I wasn’t feeling the tucks this time, and they would be completely hidden by the outer corset anyway.

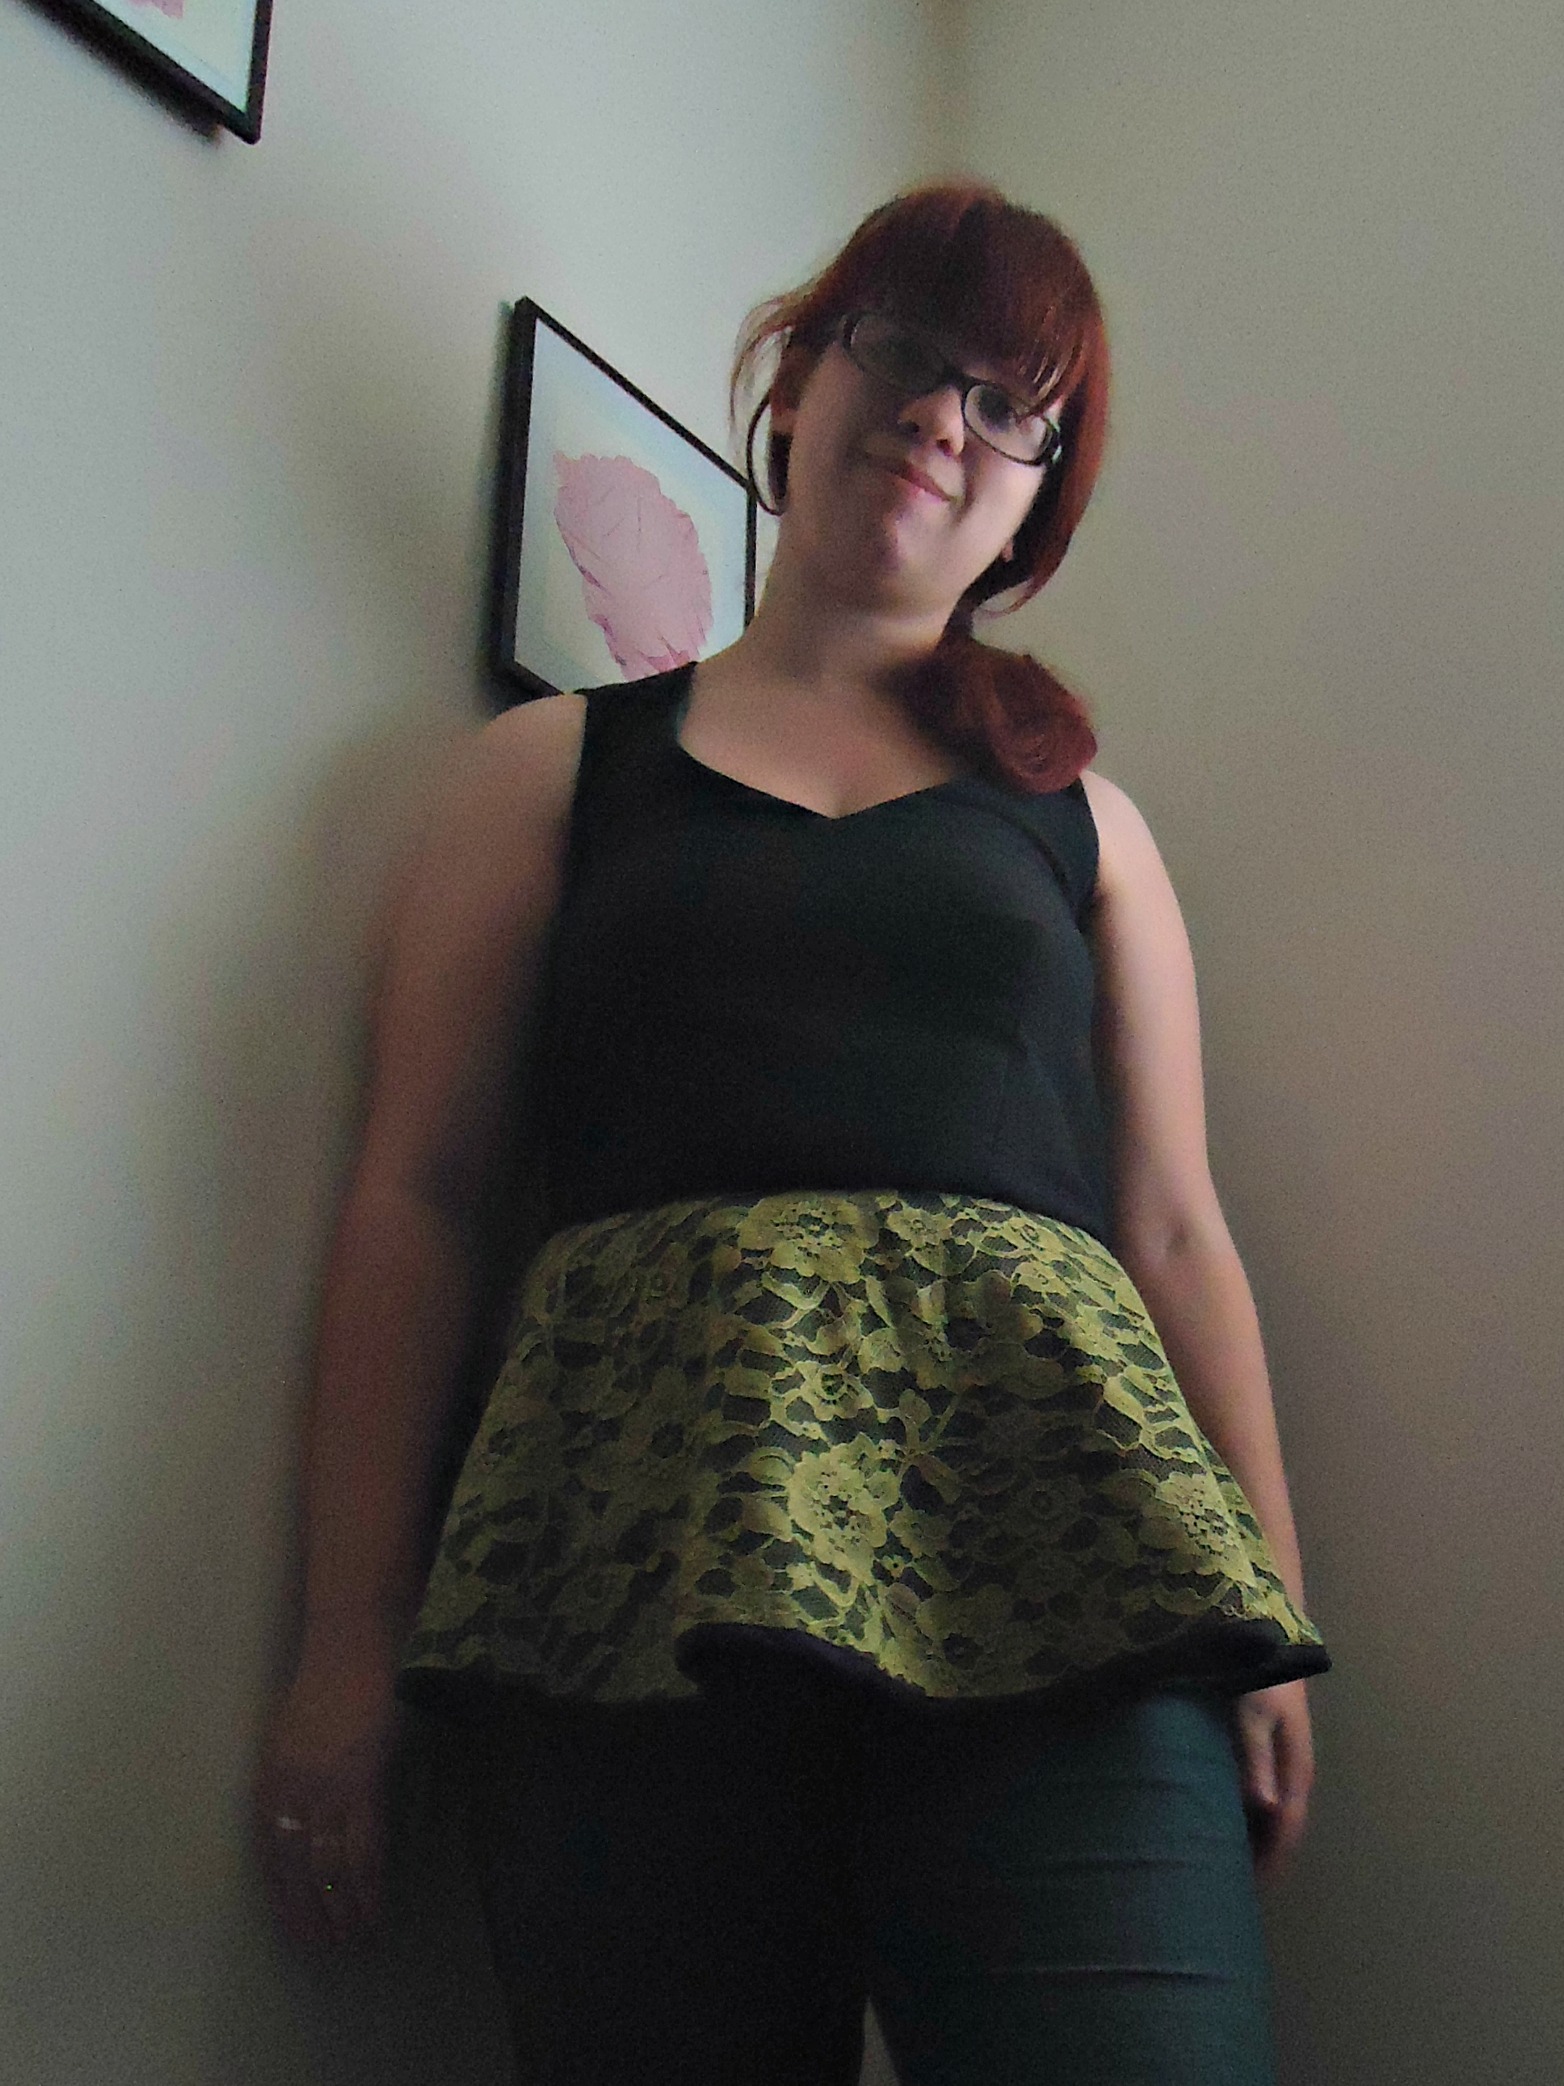
The fabric that I showed in this post three years ago that I thought I’d use for a bustle was originally going to be used for this shirt. I got all the way through making it, and was ready to cut the facings when I decided to try it on. And the fabric next to the side seam tore about three inches. Worst feeling ever.

Granted, the fabric was old and holey, and I think it’s silk, so I should have expected some mishaps. I ended up going to dinner with a friend, and once I got back I assessed my options. I looked at the pile of fabrics that I earmarked for this project, and I found this very neat, and very stiff home decor fabric. It would work for the body of the shirt, and I could use the same fabric from the apron for the sleeves. I was able to reuse the broken silk version for the facings, so that is could still be involved.

fabric

The body fabric doesn’t press very well, which may have to do with the fact that it essentially feels like lightweight bendable plastic, so the seams and the darts aren’t flat, but most of that is hidden by the outer corset.

collar

There is a slight stain on the gold fabric I used for facing, but that also means I have an excuse to use my Eleventh Doctor’s sonic screwdriver pin. I felt it was fitting.

Now that I’ve worn it once, it’s not quite as fitted as I’d like, so I’m considering taking in the side seams, and maybe adding another dart, a smaller one, to help with some accidental saggy boob look, from being too loose at the bust with a tight corset underneath.

But regardless the shirt does it’s job, and once I bind the inside seams to keep fraying at bay, it’ll serve its purpose for as long as I need it to.

front

That wraps it up for the new construction. I’ve got some more posts, like updates on older pieces, and I don’t think I ever showed you the TV purse, and also hair and makeup… But I might save that for next week! See you later!

Touch the Sky

no glasses

So here’s what my Merida pieces look like together!

EpilogueDress6

To recap, I made a set of outfit pieces to subtly reference this outfit Merida wears at the end of Brave.

So I made the skirt first, and spent ages to embroider it.

Then I made the top, which I probably won’t wear much alone, but they do look nice together!

sideThey’re connected using a bunch of hook and eyes, so that the skirt doesn’t ride down and reveal the green lace peplum.

I got all gussied up and pincurled my hair, which ended up a little wilder than I expected. Perfect for a dressed up Merida!

front

Have a happy Thursday!

My name is Agent

peggyskirtPeggy Carter is the master of well tailored shirts. Most of them are soft and drapey, and a few are structured. I’m excited to see whatever the next season brings, but from the first there were many good shirt examples, and mine is a combination.

This shirt post is long overdue. After all, I first wore this shirt in an unfinished capacity on Halloween… But then didn’t get around to actually finishing it until December. And it’s very wordy…

peggy-sideI started drafting in late September, and it went through a number of muslins (at least 4) and an incredible amount of drafting variations (meters and meters of Ikea drawing paper), some of which got scrapped before a muslin was even cut.

peggyfrontThe many alterations that I made for this shirt included a full bust adjustment, rotating and then eliminating darts, removing the back darts, adding a yoke, raising the armscye, moving the shoulder point up, doing a full back adjustment, and then taking some of that out, making a swayback adjustment, removing it, and then adding it back in, adding room to the bicep, adding room to the sleeve cap. Etc.

I had bought this lightweight linen at the same time I bought the linen for my Merida outfit, so I knew that it wouldn’t be super drapey, but not 100% structured either.

peggyback

This is also the time to infodump my many sources for patterning and fitting this shirt. This was the website I used to draft the initial block that I drafted the shirt from. I used this article to help explain and draft my one piece front/collar and facing. I’m fairly certain I tried this forward shoulder stuff too… This placket tutorial is awesome! And this explanation of sleeves and drafting remains my favorite reference, and one that I re-read often.

sleeve upper back

front lower back

The front darts were replaced by three tucks, which do a good job of dealing with the dart-replacement, but make hemming the shirt a bit miserable. I eliminated the darts in the back, and tried to use a center back seam to solve swayback issues… It only worked a smidge, and the execution needs to be improved on my next version.

peggy-raised-armsLook look look! I can raise my arms! The armscye is super close to the base of my arm, which I’ve learned is the key to a shirt that doesn’t pull out of a tucked-in state, and since I knew that I would be tucking the shirt into the 40s style trousers, this was very important to me. Because of the size and shape of the armscye, though, this shirt is oddly uncomfortable to take on and off. The sleeves are ginormous at the top, but because the circumference of the base of the sleeve is about the same as my bicep at its fullest fat level, the sleeve base pulls a little as I put it on. The sleeves are ginormous mostly because slimmer set sleeves were creating extreme draglines, so I overcompensated and made a super large sleeve cap instead, since I was running out of time. I’m hoping to slim them down slightly for the next version.

peggy - back-skirtThis was supposed to be my Halloween costume, if you remember. And a version of it was in fact done for Halloween… One that wasn’t hemmed, no cuffs, no placket, a very ill-fitting back, and I sewed the top three buttons on when I was in the car on the way to the party… Also, I was sick-ish.

So most of the finishing was done post-Halloween. It’s currently a bit too chilly to wear the costume out of doors, but I anticipate that once spring comes, I’ll have more opportunities to photograph and show you the full costume! Maybe with a second version, that’s a bit neater and more crisp.

peggy-front-skirt

In fact, I can’t actually wear this version as is… The cuffs don’t overlap, and for these pictures I’ve managed to pin them close with these tiny treble clef pins that I got in high school. Unless I take those off, and attach new ones (if I can find any remaining scraps of fabric), then this shirt won’t really leave the house.

I keep talking about this next version… I have the fabric, a white shirting material, and I’m just working up the motivation to cut it out and make it.

First I’ve got to finish this homework assignment due in four hours…

Chase the Wind

I posted two weeks ago about my Merida skirt, which I’m super proud of… all that embroidery…

front full

Today I’m going to tell you about the top that I made to match it. I was never really into two piece sets, because most of the ones I found consisted of shorts and a top. But when I had the idea to make the Merida themed outfit, I knew that I didn’t have a need for a black dress. I wanted to have a more versatile outfit, so a two piece set of a skirt an a top it was!

The peplum craze is still going, and excepting my Belle Mark 2 (where it was “accidental” because it as a dress was too short, so I cut it shorter) I don’t have any in my wardrobe, so I wanted to try one out…

Verdict: I don’t really like it, but I’ll talk about that more later.

side

The top is made of the same heavy black linen (from Joann’s) as the skirt, but its got a green lace layer over the peplum, and is lined with a forest green “posh” lining from Joann’s. The lace is this gorgeous stuff from my stash, and is the same as I used in the Dandelion suiting dress and the Dandelion linen sleeveless top. I actually think that this linen might be the same weight as that sleeveless top

front

I self drafted this top from the same general “block” that I started with for Peggy. The block itself is quite… wrong, but it was a good starting point for the moment. Since it was wrong, I had a few adjustments to make. I had to raise the armscye since it was drastically too low. I also made it sleeveless, so I raised the edge of the shoulder and made the shoulders a little more snug. I had to adjust the front and back darts in order to get it to hang properly. Using a side seam zipper seemed like a good idea at this point, especially since I only had a deep green, not a black one, but I’m not sure that it was the right call.

The muslin I made out of the same linen was pretty terrible, so I had to make changes. Namely change some of the darts, and fix the side seams, which were leaning to the front. The back of this version is now both tight and loose, with a bubble above the darts… I’m not sure if its that the fabric is super finicky, or if its a problem with drafting that I’ll need to fix for next time I make one of these, but I guess time will tell.

front smile

The peplum itself is a 3/4 circle skirt, and is hemmed with black bias binding. It’s got a lot of body, because the linen is so heavyweight. That’s probably why I don’t really care for this peplum. I do like the idea of it, and I like the Belle version, made out of a fairly thin knit so it hangs flat, but I think the body of this version is too much. Especially with looser bottoms like these jeans. I don’t own any pencil skirts, because I feel like I can’t walk in them, but I bet such a skirt would be a great match for this. I’ve mostly worn it with skinny jeans, and I think it balances well.

back side

Looking at the pictures, I can’t tell if the horizontal waist seam is bubbling or whether its an unfortunate trick of the light. Now that I have a full sized ironing board this will probably be easier. My tabletop ironing board was too small for its own good, though I’ll keep it around for small scale things like quilt top seams and the like. I’ve been thinking about adding some embroidery up by the neckline, but I think I’m just going to leave it alone. More versatility. The neckline doesn’t always lie flat, which is something that I will need to improve for future drafting projects, but when its tugged at, it will, so once rigged up to the skirt, or any skirt for that matter, it should help.

Realistically, this top will mostly be used with skirts, since its a plain but structured top above the peplum, but if I ever go on a trip and bring it along, I can see wearing it alone. Only time will tell!

I’ll be back soon with pictures of the two parts together, but before that, I need to actually rig up a way to fasten the two together… Procrastination is my specialty, after all.