Claudia Vest, Mark 2

There’s no snazzy quote associated with this post, since I’ve used a lot of the ear and eye catching ones already…

Plus I’m writing this before bedtime to post in the morning, so searching or listening to episodes from more is not exactly going to happen… Because of that bedtime thing…

front

So just imagine some Claudia Donovan sass, if you will!

The first trial of this vest was made three years ago out of a lab coat that I bought when I was abroad, perhaps the cheesiest and flimsiest lab coat around. When I pulled it out again recently, I realized that there were large obvious pit stains. And it didn’t fit. And it had a normal zipper, not a separating one, since that was always something I wanted to change but forgot to.

So I decided it was time to start over.

wback

This version is based off of the old one, out of linen this time with some redrafting since I know how to make a collar and facing now. It’s fully interfaced, since the linen was a bit shifty.  When I tried it on, it was still really big, despite my redrafting efforts, so I took it in on the fly, with pinning while I was wearing it, because separating zippers are magical!

It’s now a bit snug, but I like the way it fits, and I’m planning on actually doing that exercise thing, now that the semester and most of the craziness that goes with it are complete. So it might be a little less snug by the end of the summer, and that’ll be good too!

lining

I took the old lining since I adore the fabric, and I think Claudia would too, and slapped it onto the new version. I had to fish out my scraps to add some length to the top and bottom, but I had saved all of them for this exact purpose. I whipstitched the lining on carefully, hiding the ends under the facing for a clean line.

side

This new version makes me really happy, since I was so sure this costume was already finished barring pictures, but since I’ve remade the vest, not only am I feeling better about the costume as a whole, but I’m now actually pushing to make the next pair or two of Ginger jeans, since they’re potentially going to round off the costume.

In the next week or two, I’m going to be announcing an exciting costume/fangirl/crazy thing I’m doing, so stay tuned for that!
open

Design Donnerstag: The Moment and Falling

Recently I got the idea to bring my artists tablet to my office at  grad school, as there are a few times that I have nothing much to do, which lend themselves greatly to designing things.

Meaning midday Friday when I have a three hour chunk of time between classes… And the likelihood that I would do work over my “extended lunchtime” is small.

So last Friday I finished these up!

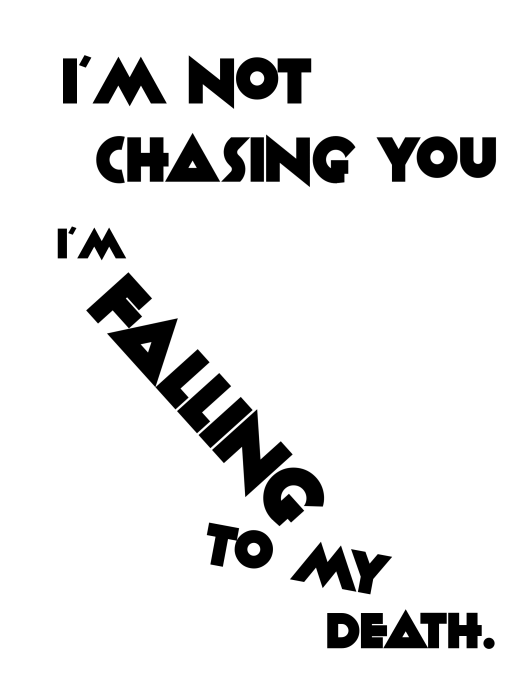
A simple text based design of a Claudia quote from Warehouse 13:

fallingdeath

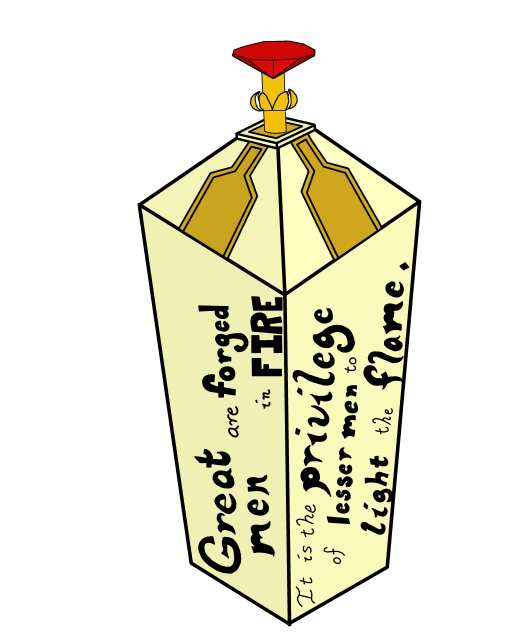
And an illustration of the Moment button from the DW 50th Anniversary episode. Because why not!

great men

Plus the quote is lovely. If a little sad.

We are not the B-Team fool, we are the second A-Team.

other

So. I have finally finished the vest for my Claudia costume. And today I’m subtle cosplaying her.

fabric

I know I told you I was done before, but I found that wonderfully neon fabric I told you about, so I did create a lining.

There’s nothing like handsewing a lining into a garment that makes you miss your sewing machine.

pinsAfter an additional eight or so hours of sewing, my vest is absolutely complete!

frontAnd now I’m off to class!

New guy gets to fix the fish.

Edit: I wrote this post a few weeks ago, while waiting to take a picture of the vest… Then forgot to take a picture until now. But I liked the post as it was… So here you go!

I got my serger! And it’s even kind of working!

Time to get to work on the vest.

As I had mentioned last time, I have seam ripped my muslin, and prepared the lab coat I planned to use for the fabric.

For my labs last semester I was required to buy a lab coat, but at my normal college, it isn’t standard practice to wear one unless you are doing a messy experiment, in which case you borrow one of the lab coats from the office.

lab

So I am putting this lab coat to good use!

pieces

I’ve cut out my pattern pieces from the back and the sleeve pieces, as the front had too many pockets and sleeves.

The serger is up and running. I’m hesitant to run it for too long until I get it completely worked out, which may be a while. I’m still planning on using it, just carefully.

I’ve overlocked around each pattern piece, and used a different serger stitch to sew up the seams. I’m getting really good at threading this machine.

I sewed up the seams, turned over and topstitched the armscye, and then hand picked a zipper.  I’m going to need to replace it with a separating zipper at some point…

However, my camera battery died in the middle of the resulting steps.

finished

I’ve got a photo of the finished project though!

Here it is! Until I get it lined and pressed!

More than just an oversized IPhone

This is my final wrap up post for my Altoids tin Farnsworth.

farnsworth - front


I’ve decided that for projects that span more than two posts, I want to give more of a real goodbye.

Both the projects and I deserve it, in my humble opinion.

Here are the links to each post, in order from inception to completion.

u17162wh1303x040066r103

Oh Farnsworth, my Farnsworth

farnsworth - dsc09302

Busy Bee

farnsworth - dsc09336

Elbow Grease

farnsworth - finished-squiggle

Loving the Fugue

farnsworth - left

I’m not laughing at you, I’m laughing with the horse

farnsworth - top

Proceed with the splaining.

The Farnsworth has fascinated me since I started to watch the show. I’m not actually a smartphone user, so at the time, it was really neat to have a communication device that was more face to face.

Yes, I know that there are apps like Facetime and Skype that will let you talk face to face, but I’m not quite up to date with technology.

Some of my thoughts on the construction:

Next time I want to make an altoids sized prop, I should weigh my choices better. If I’m going to cover the lid with something, like felt or paper, then an Altoids tin is fine, as the embossed lid will be covered. But if I’m just going to paint it, then I should find a tin without embossing.

It’s very neat that underneath the covering of the tin is a somewhat glossy coat. It didn’t even feel all that scratchy even with the sandpaper.

Rustoleum smells. But it does cover well, and I really enjoy the shiny coat from the glossy black paint. I do need to buy a few extra paint brushes next time. Or decide to do painting like this when I have a sink that is not white to wash the brush in. White porcelain and black paint don’t exactly work together. In my previous experience, at least. I decided not to wash out my one paintbrush, so each time I did a new coat the brush bristles were less and less bendable.

Wire requires proper tools to bend and work with it. I have bought some since, but I now definitely know that eyeglasses cases and nail clippers are not suitable.

Check the shipping address to make sure you aren’t sending your purchase to one of the other many addresses you may have on file. It happened to me… three times now. In the past month?

Realize in advance that cardboard is a wonderful substance, and though its not underappreciated, it should be acknowledged more often.

Glass can be quite heavy.baby-farnsworth.jpg

But all in all, the Farnsworth looks really good in my hand, and even in its diminutive state compared to show-accurate ones, I think its a pretty good build!

Onwards!

Proceed with the ‘splaining

Did Claudia’s Farnsworth not disintegrate in the penultimate episode of this season? And then reappear in the season finale?

farnsworth - front

Well, whatever happened, I’m finished my version.

farnsworth - lens

I received my lens yesterday, which nearly completed my prep.

I still had not managed to solve the problem of the combination lock, as I needed to see how big the lens would be within the tin before I could move on to cutting up the microphone tip and making a combination lock.

farnsworth - tools

There were a few circles of the microphone mesh, and a few ideas about the lock that circled through my head.

With a little work from my gold paint pen, I ended up using a rubber piece that I had cut off the microphone while I was taking it apart.

farnsworth - notebook cover2

The plan came together quite quickly last night.

farnsworth - notebook cover


First the cutting out of the black plastic piece. I had the cover from an old black Fivestar notebook handy, which I use to keep wall decals safe as I travel to and from dorms and college and such.

fansworth - mic cut

I had some extra space in the bottom of the tin that I could raise the plate structure up, so it looked more 3-d and still manage to close. I did this with a few layers of cardboard. I had to cut out a space for the wire mesh, though, so it would sit flush with the cardboard surface.

Then I cut out the circle to reveal the wire mesh, and glued on the “tuner.”

farnsworth - lens glue

The lens needed to be glued to some paper, to give it that blank screen look.

The assembly continued, and all pieces were glued together with super glue, which currently is my only adhesive option.

farnsworth - top

And I got my finished product! Do you like it?

farnsworthleft1

Edited: As of right now this is the end of this project. Follow it from its inception, to further planning, to sanding and painting, to the wirework, to the gold detailing, to (this) the gluing of all the components together.

I’m not laughing at you, I’m laughing with the horse.

So I’m continuing work on my Farnsworth as I’m waiting for my new serger to decide it wants to sew.

If I have the option of not handsewing, I’ll avoid it.

With very few exceptions.

So I got the wires all glued in, though I’m not sure how permanent the super glue will end up being.

We’ll see!

farnsworth - left

I received my gold paint pen, and almost immediately got to work on some detail work.

farnsworth - full

The handwriting inside is a little too off center for my liking, but it will do for this project. If I ever redo the Farnsworth, I’ll be a little more exact and a bit more careful.

farnsworth - mic

Feel free to ignore my artsy photography choice above. I’m working on it.

Also I took apart a broken microphone, and will be using the microphone wire mesh for the same basic purpose on my version.

I just need to figure out how to cut it.

Perhaps I need some wire cutters.

Edited: As of right now this project is finished. Follow it from its inception, to further planning, to sanding and painting, to the wirework, to (this) the gold detailing, to the gluing of all the components together.

What light from yonder umbilicus breaks?

I’ve made a bit of progress on the Farnsworth, and the painting is all done. That’s always a big plus.

But today I want to show you what progress I’ve made on something else.

supplies

This summer I don’t have access to my normal sewing supplies, as my summer employment required a flight. My sewing machine would not terribly like my suitcase. And its a bit too heavy. And I’ve got too much fabric to fit into one suitcase, let alone bring clothing to wear along with it.

This also means that I’m not planning on doing any subtle cosplay, as the major components of my wardrobe aren’t with me. And its much too hot here to wear jeans.

But none of this has stopped me from working on my plans.

It just happened to… slow them.

I bought this sewing kit from Amazon, and its a  nice little starter kit. If you are new to sewing, and want something to work with for simple handsewing, this may be a good deal for you, but mostly I needed the scissors and the pins. I’ve had experience with enough unsharpened scissors and cutting fabric for me to need to invest in another fabric pair, even if the kit overall was cheap.

But anyway, back to the point of this post. I have begun work on my white vest for my Claudia costume.

1

I was going to try to find an online pattern, and while waiting for my Amazon package I did some extensive searching, but I came up with very few patterns that were close enough to help. I decided instead to make a pattern based on my measurements.

mini

This is what I came up with.

pattern

I knew it would be a bit wonky, because I’ve rarely created a pattern that was wearable the first time, so I decided to make a muslin. I took an old sheet, traced my pattern, and gave some extra fabric space in the areas I suspected needed to be enlarged.

I unfortunately forgot to take a picture of this step. I was too excited and started sewing immediately. Hand-sewing.

On the plus side, my stitches are becoming more even?

aside1

Here’s what the muslin looks like when I’m wearing it. For being a first drafted pattern and handsewn by a machine lover, I think its a pretty good effort! I’m not quite sure if I want to do anything about the shoulders. The muslin makes the shoulder seam lift up a bit, and I think that might look okay with the final fabric. I’m going to increase the width of the fabric in the front, because I want to have a fairly wide inside seam there, so there is a nice appearance when the collar is folded over.

afront1The front will match, I promise, it just was being too picky for pictures.

I found this awesome fabric a few years ago for my quilting stash, but I haven’t quite figured out how to use it yet. Granted, I’ve been without my sewing machine for all but two months of the year since then.

The fabric is a neon yellow-ish Gatorade color, with a floral pattern in black. Kind of a combination of this fabric, if this one was the background yellow. And without the stripes.

Claudia would love this fabric.

I’ve decided to line my vest in said fabric.

I’ve loved the idea of lining demure jackets and coats in crazy fabric, and this is my first opportunity to try.

I’ve got a heavy lead on a bid for a serger machine on ebay, and so I’m holding off until I know the outcome of that before I cut the fabric and move on, but if I am to handsew it, I’ll be using this technique to build a sturdy garment.

So that’s what I’ve got and where I’m going. Now that I’ve decided on my lining, the project won’t be fully finished until August, when I get back to my fabric stash.

Next step? Seam rip the muslin.

Loving the Fugue

I’d certainly not want to clean out the Warehouse’s neutralizer annex.

My first coat of paint is complete!

farnsworth - dsc09354


Yesterday I had completed the coat on the outside of the tin, and today I painted the inside.

farnsworth - wire

Here’s the wire that I had bought to imitate the squiggle pattern on the left side of the Farnsworth.

u17162wh1303x040066r103link

Did you know there are 13 of those squiggles? I thought it was clever.

farnsworth - cutting-implements

I did my best to straighten the wire out, and then I clipped a piece off. I don’t have my wire cutters on hand at the moment, so I grabbed my scissors and tried my best. Then that didn’t work out, so I brought out a trusty craft knife (which I was super careful with, by the way). Still needing something stronger, I used my nail clippers, which did the trick with some bending at the connection point.

I managed to get the plastic coating off of the wire with the craft knife, and started bending. I ended up using a glasses case for some leverage.

farnsworth - bending

I’m only using seven squiggles because my wire is thicker than I had thought, and this many provides the right aesthetic appeal.

farnsworth - finished-squiggle

If the paint was dry enough, I would have arranged them on the tin for you, but unfortunately its still a bit wet.

I still haven’t quite decided how I’m going to imitate the tube from side to side and the rubber washer like thing, but I will be working on that.

Edited: As of right now this project is finished. Follow it from its inception, to further planning, to sanding and painting, to (this) the wirework, to the gold detailing, to the gluing of all the components together.

Elbow Grease

It’s hard work to sandpaper the finish off an tin.

Satisfying, but it requires a fair amount of elbow grease.

farnsworth - dsc09339


I took a trip to the hardware store yesterday to pick up some supplies.

I started using the sandpaper on the tin, starting on the bottom, which cleaned up fairly well.farnsworth - dsc09333


The sides of the tin were much harder, with the curves and the lid hinges.

farnsworth - dsc09330

I gave up mid-way on the sides and started on the top.

farnsworth - dsc09336

Once I was finished with the entire outside, I scored the inside a bit with sandpaper.

fansworth - dsc09337

If you haven’t gotten altoids in a while, you may not know that the top of the tin is actually raised, both with the banner, and the word Altoids. I want to have a Farnsworth, not a Farnsworth masquerading as an Altoids tin.

I tried lightly pounding the tin with a mallet to lower the raised part. Key word being tried. I think I flattened it a bit, but I decided to stop when it wasn’t working out very well.

farnsworth -


Then I started the painting.

I looked at Claudia’s Farnsworth a little more in a few different episodes and realized that the casing is entirely black, inside and out,  so I had bought some Rust-oleum paint and started working! I’ve got the first coat on the outside, and tomorrow will be working on the inside. Maybe two coats, and it’ll be good to go!

Then comes the inside work, which will be the fun part!

Edited: As of right now this project is finished. Follow it from its inception, to further planning, to (this) sanding and painting, to the wirework, to the gold detailing, to the gluing of all the components together.