Bobbin Lace

About once a year I start itching for a new hobby (foam, watercolor, app building), or revive a long-hibernating hobby (leatherworking).

This year’s hobby is brought to you by a developing interest in how the consumable items I reach for in making a garment are made, combined with an interest in the history of clothing in the past.

For many years I’ve been collecting vintage notions, like bias tape, buttons, lace, hook and eyes, etc. Using them has been a mixed bag, with the bias sometimes breaking after a few washes, or there being two hooks and twenty eyes, but the practice of looking for these at a new thrift/scrap store has become something to look forward to.

I have a whole bucket of lace, most of it vintage from thrift stores and the stashes given to me by my relatives, but I wanted to know how it would be made before machinery.

There’s a couple different ways of going about making lace, from needle to knitted to tape to knotted, to tatting (which I also sometimes do), but today I’m going to talk about bobbin lace.

One day I might do some more research on the history of bobbin lace, but so far I’ve been investigating the practice. To sum it up, you wind thread on sticks and twist different pairs together and pin them in place until the thread pattern is developed.

Patterns for bobbin lace are transferred to cardstock and then pre-punched (so don’t look at my skinny lace’s pattern which was on graph paper… I learned for the second go.). The cardstock adds stability, and the pre-punching gives your pins a location to maneuver to so you don’t have to look too hard to find the correct place.

Bobbins are designed to be held, so there’s a section at the top for the thread to go, and then a section below that becomes thicker like an ergonomic pencil grip for better maneuverability and to give the bobbin some heft. I’ve gone for the cheapest option to start out, since I never know how long a new hobby will keep my interest, but I can see why one might prefer bobbins that are longer or heavier. You can also “spangle” them, or put a loop of heavy beads on the bottom to give them that weight, but I’m keeping it simple for now.

I’m using some thread I picked up from a thrift store a while back, which is a mercerized cotton size 30.

Bobbin lace is worked in pairs of bobbins, so you’re working with four individual bobbins at any given time, or two pairs. Depending on what type of lace or what pattern you’re working you’ll do a number of actions to complete a stitch. Most of what I’ve been doing is double torchon ground, which is a fairly hefty stitch, as it’s nearly double what some other patterns require.

In the first week or so of playing around with the hobby I mostly worked on a foam pad. I quickly learned this is not ideal (being stabbed with pins is no fun) and set out to make a round pillow, since I mostly want to make long lengths of thin lace, and a round pillow is ideal for this, since you’re always adding more length in the round.

So I took this cardboard tube left over from a printer at work, covered it with a layer of floor-mat foam, then wrapped a fair bit of batting and pulled as tight as possible and sewed it in place. I then made a very tight cover out of some jersey from my stash and stuffed excess fabric from either end into the tube’s center.

Tada! Pillow!

After upping my game pillow-wise, I also decided to film some of the process, so when you get to the bottom of this post you can watch my video about Bobbin lace that has a graphic explaining a little more of the mechanics.

First I made a small bookmark piece, which took about a day, then I made the (not so smart) decision to wind a lot of thread onto the bobbins and work a single design until I ran out of thread.

Two months later I finally took the lace off the pins. Apparently I have to be in a very patient and also probably bored mood to want to work on the lace. Hopefully that’ll change, because right after taking that piece of lace off I wound up new bobbins and started a new pricking, one with variety and intrigue.

And if you’re wondering whether I’m trying to psych myself into doing some more lace right after writing this, the answer is yes.

I don’t want to say I don’t like it, or I don’t enjoy doing it. I think my current problem lies more in the state of the world and the limits that puts on my ability to change my setup.

For instance, my pillow is great, but it is also round and rolypoly. That puts a serious damper on where I can put it and still comfortably work the bobbins, and right now that’s seated on a table with something wedged behind it for leverage or on the edge of a chair propped up by books. I think I could rig something up if I could go into work and utilize the woodworking tools, but that’s for a different month.

For now, I’m going to spend an hour or two untangling my current mess of bobbins and making some lace!
It’s time to talk about the gauntlet.

So picture the scene: I have been waiting for a year to see Avengers Endgame. In some ways I’d been waiting for this movie since I first saw Iron Man in 2008. The whole year I was trying not to speculate and guess what was going to happen. I’ve tried to not watch trailers, since I was going to see it no matter what. I caught a couple pictures, by accident, but other than the white team up suits I didn’t see much. I wait until the weekend post premiere to see it and manage to avoid spoilers on the internet.

I’m in the theater, one of my small local theaters which has thin walls, but my movie is going to be the loudest anyway. There’s a pretty good crowd, but there’s only about 4 people in my row 3/4 of the way to the back.

I am shocked by the time jump, but liked the plot device. I enjoy the Bruce Hulk combo, and Scott’s time travel banter. I like Morgan. I can see why Clint has changed. I cry over Black Widow. And then they create the gauntlet. The Iron Man/Hulk/Nano gauntlet to take the strength of the infinity stones to make another snap. It’s a great team up of all the sciencey people of Marvel!

20190827_10114721

And then the “twist.” Thanos comes back to the future from the future past, and wants the stones, so he blows up the Avenger’s HQ. And suddenly, the person who has possession of the gauntlet is the least powered person on the team. Clint Barton.

In the MCU, he’s survived on wits, on archery skills, and on hand to hand combat. But he doesn’t have a super suit that flies or shrinks. He doesn’t have sorcery or superpowers. He’s just a guy. A guy with skills, but just a guy.

That was the image that stuck with me when I left the theater. Sure, I cheered over the “We’ve got this” moment, I cried over Tony, I was heartened by the win, and was pleased by the dance. But a guy playing keep-away with a seemingly unbeatable alien. That’s what stuck.

So when I realized I could go to DragonCon in August, I decided to make a Hawkeye/Ronin costume and carry around a gauntlet to recreate that moment. It’s maybe two minutes of the story, and probably only 30 seconds of screen time total. But that’s what DragonCon is for! Recreating beloved moments, and someone will get it.

Even before making the costume, I knew I needed to make the gauntlet, and I knew that would take the longest time, mostly for drying and waiting and mistakes.

Foam was new to me. I found my local Harbor Freight and bought the two different types of floor mats they had, and used both for the costume, but only the thinner rolled one for the gauntlet.

I found this awesome 3D Pepakura model for the gauntlet from MasterMod, and printed off a cardstock copy so I could test out the size and how it fit together. Cutting those pieces nearly broke me, and I hadn’t even gotten to the foam yet.

20190730_12162003

Deciding to size up a bit, I printed out a new copy, and set to work cutting the foam. I was using a couple of fresh X-acto blade, and was still having trouble, so next time I’ll follow suggestions to use a scalpel.

I would cut out some pieces, and glue some pieces, and cut some pieces and glue some pieces. At the time I was living in a townhouse where I only had one room for both living and crafting, so I didn’t have the space to cut and arrange all the pieces at once.

Contact glue was my weapon of choice for assembly, and boy is it smelly and sticky like mis-made caramel sauce. The stick, not the smell. Something I didn’t consider until it was too late was that the edges of the foam should probably have a specific angle in order to fit together properly. Oops!

Also, don’t let the can of contact glue fall over and spill into the bottom of a bookcase. I got lucky, and the carpet underneath the case wasn’t affected, but it could’ve been disastrous. And eternally smelly.

Cut and glue and cut and glue and cut and glue.

Okay, so then it was assembled and I needed to get a move on, as DragonCon was coming up quick.

20190827_10121926

Plastidip and North Carolina humidity in August doesn’t work well together.

Average spray paint is actually worse.

Masking off tacky spray paint and mildly tacky Plastidip is less than ideal.

20190827_10120123

So I grunged it up with some black and brown acrylics.

The jewels. Those were a treat. I found them in a grab bag of rhinestone jewels at Michael’s. I spent about 20 minutes sitting on the floor of the young craft kit section one night after a work shift making sure that I had the correct colors and shapes if I was going to spend 15 dollars after a coupon on a bag of jewels I might never use afterward. Massaging a bag of craft jewels 15 minutes before closing is… not a pretty look.

20190827_10122627

I think I used contact cement to attach them, then used some kind of puffy paint (craft supply hoarding for the win!) to really cement them in.

For the inside, I decided to keep my super glue, and my wallet inside the glove, which would mean that I needed a pocket inside.

20190922_07485904

I found some scraps from the Merida skirt, made a zippered pouch, then glued in the pouch and some lining to black out the inside of the glove.

And that rounded out my Nano Gauntlet! It now graces my curio cabinet in a tribute to Ironman.

Guess who made an app?

Quick post today…

Over the weekend, I rediscovered the MIT App Inventor, and ended up with an app!

Now, I want to note that I have about three years of programming experience, but the App Inventor is a block programming system, so if you know how what if-statements are, then you can program… I mostly got bogged down when I was writing scripts about things like semicolons and colons… So many semicolons.

But back to the app. I made my perfect row counter for things like knitting and crochet. I’ve tried so many such apps, and they’re either too complicated for my needs, or they have annoying ads, etc.

rowcounter

So I’ve made one that fits my needs perfectly! It’s called “Row Counter” because I am incredibly creative.

Screenshot_2019-02-19-09-07-19

It holds data on four or less projects, as a motivator to not have too many WIPs, and it’s a minimalistic design, simple buttons words, and a blank canvas to work with!

Screenshot_2019-02-19-09-04-28

It’s only available for Android phones, because that’s what I own and love, so sorry Apple users!

Screenshot_2019-02-19-09-08-12

I’d appreciate it if you give it a look see, and see if it’s right for you as well!

It’s free, so there’s no pressure either way… If it works for you that’s awesome!

See you next week for (perhaps) a yarn post, unless something even cooler comes up!

What did I make for the holidays?

At long last (meaning about a month and a half delay), I’m here to show you what I made for Christmas gifts!

pens in a spiral

I got the opportunity to work on a wood lathe in the fall, so then I decided to make pens for my family and friends!

(Let’s have a moment of silence for the approximately 25 pen blanks I broke to make these six pens.)

(And we’re done.)

coop

I made two portraits of my neph-dog for his ‘rents, but I think I only got a picture of one, my watercolor version. The other one was out of pencil and colored pencil.

lighthouse

For my dad, a lighthouse enthusiast, I also etched the Cape Lookout lighthouse onto the  side of a cedar block!

blockprints

And for my mom I also made a set of block printed tea towels, with my very own block printed doodle design!

pens in a line

Let’s have another look at those pens… Since I’m so very proud of them!

Happy Valentines Day!

Not a Background Lannister – Prop Shield Tutorial

first

So I started with the trousers last Wednesday… The shield on Friday… Next up in the lead up to the costume reveal is the shield.

And boy am I proud of it!

I have access to a laser cutter, at my job, so I put together a “quick” file (it’s never quick) for a shield that would fit on one piece of plywood. I could’ve made a bigger one, but I was trying to be material conscious, and I’m glad I kept it at that size. The laser in question is technically two feet “wide” in material dimensions, and 4 feet long, but it’s a little bit smaller in both directions due to crookedness and use  over time.

I worked with 1/8″ plywood, and made this as solid looking, but light as possible. There are two fully solid pieces, with multiple border pieces, one set in between the solid pieces, and two sets on the front, and then the decorative pieces there too… This would be better explained in pictures…

alanna_pullapart

Yeah… Like that.

So I layered and glued everything together. It took awhile. What I should have done then, is sand those edges. I didn’t. Moving on.

edge

On the top of the shield I used wood filler and a putty knife to shove material into the seams so it was a fake beveled/routed edge. That’s honestly what took the longest. I’d put on wood filler, wait for it to dry, sand it, apply more when it inevitably chipped and repeat.

bevel
Yeah… not meant to see it up close.

I’m kicking myself that I didn’t get progress pictures as I went. So then I painted the shield. Chestnut brown on the back and sides, then red and gold on the front. The gold is Bright Gold Lumiere Jacquard fabric/universal paint, and the others are stash cheapo acrylic paints. Oh, I so love the Lumiere paints.

lioness
Gaah. I’m gonna stop it (mostly) with the close ups on this one.

On the back are two more sets of laser cut pieces, the main point of which was to provide some material for screws to connect to. Then I guesstimated sizes of leather to attach the shield to my arm, screwed it into the top and bottom bracers. I had to reattach the bottom ones to make them tighter so I could control the shield a bit better, but then I was completely done with the shield!

Lightweight, blocky and just what I needed.

It did mean that I hit a bunch of people accidentally, but… that’s being at a con, right?

I was not too surprised that this wasn’t the recognizable part of the costume (It looks too much like the Lannister crest, or Peter’s from Chronicles of Narnia), but I was surprised what was! You’ll have to tune in on Wednesday to figure out what I’m talking about!

corner

That probably sounded like a ending, but I’m popping back in again to say that though I made this with a laser cutter out of plywood, you could totally do something like this with a craft knife and some stiff foamboard or foam, and come out with similarly awesome results!

Is the pen really mightier? – Prop Sword Tutorial

first

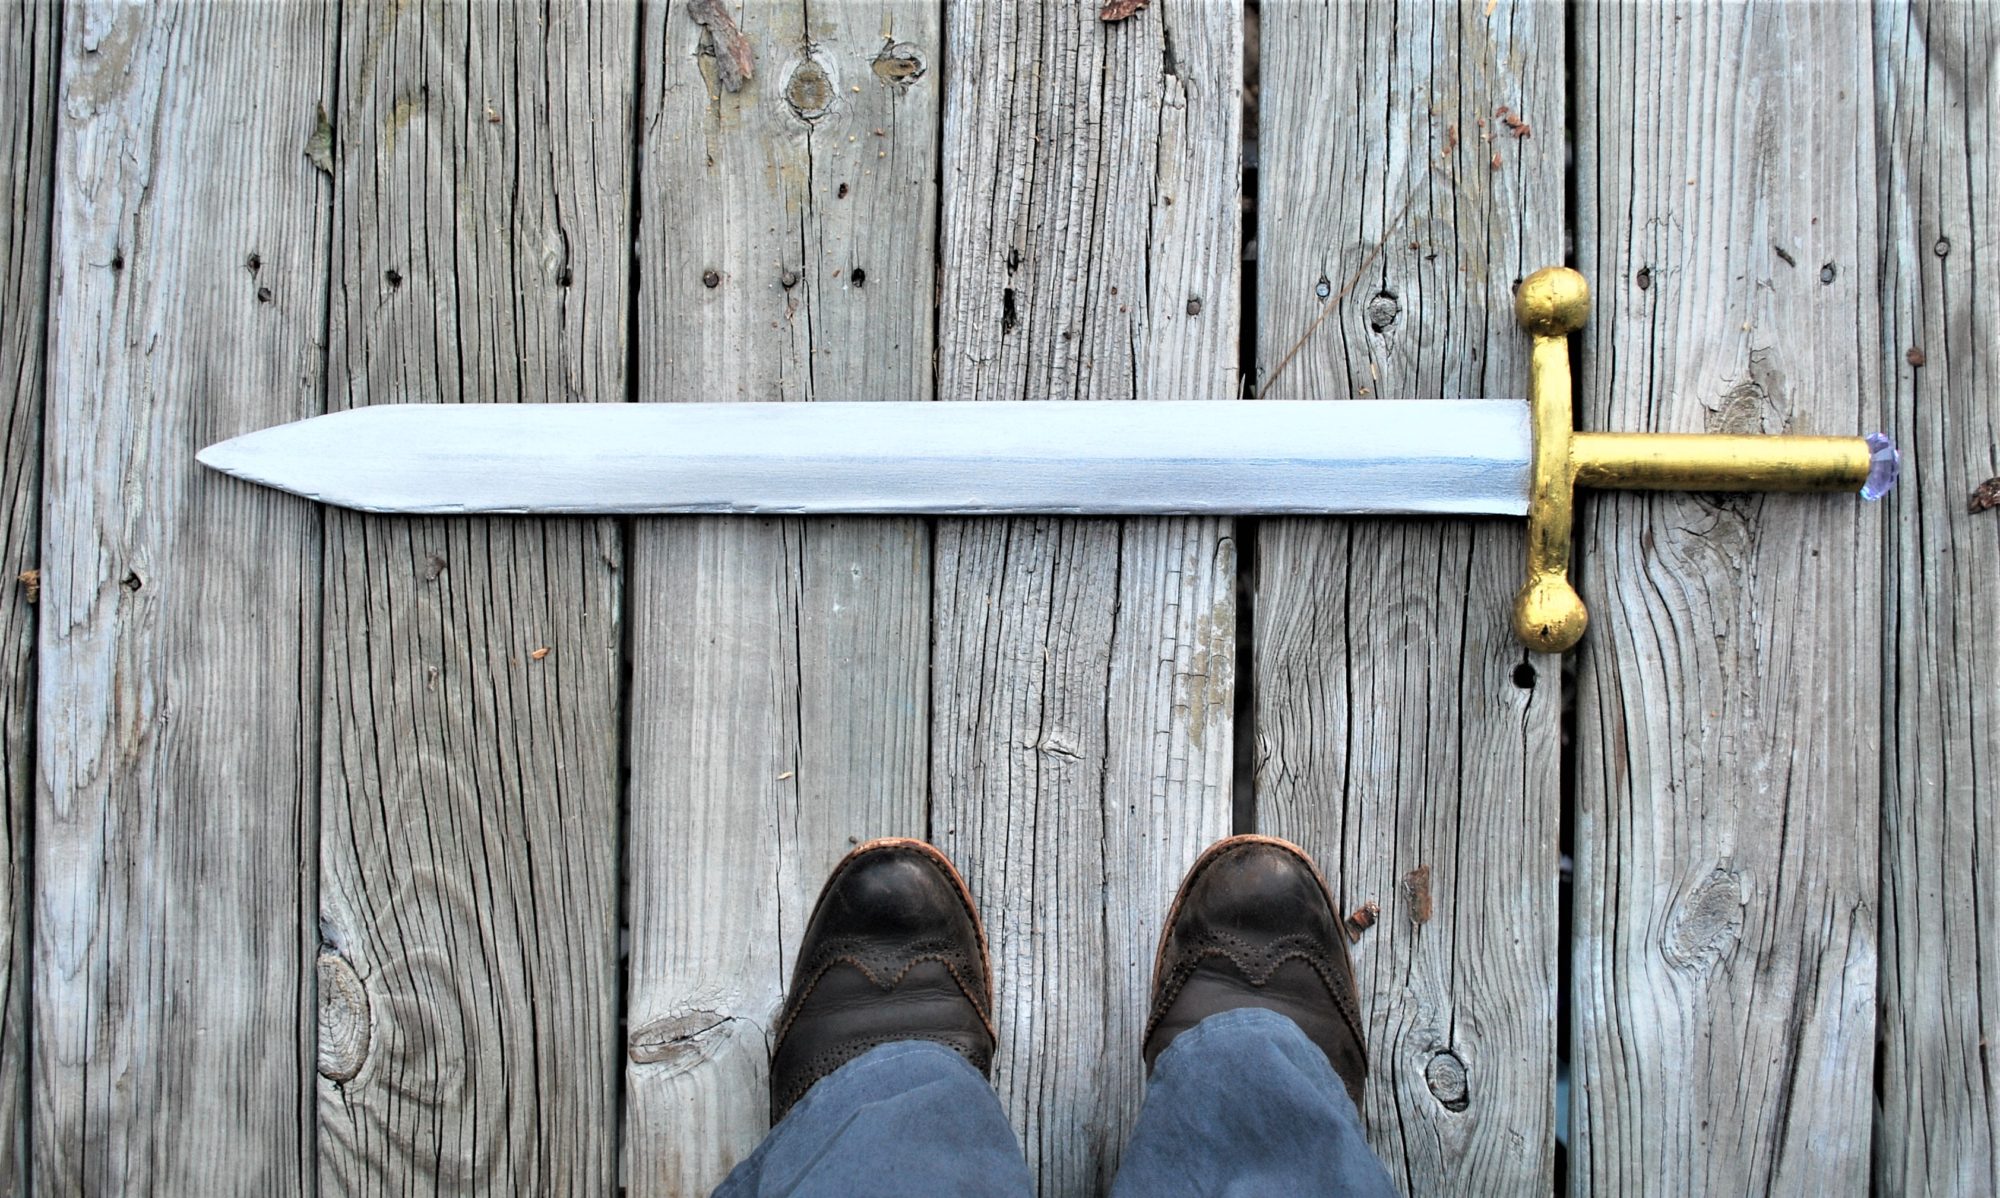
The first prop I needed to make was a lightweight sword. It had to be a short sword (so the double handed sword I bought at my first DC was out) and it had to be me-sized. So smaller.

full

I went to Michael’s one day to scope out the small plywood situation, and ended up with Basswood, I think with the dimensions 24″ by 4″ by either an 1/8 or 1/16″ but I’m not sure which. I also purchased an 1/8″ diameter dowel, which gave the sword it’s structure. That was the cheapest Michael’s trip ever, because with a coupon, the main part of the sword cost $2.50. Craft stores never work out that well for me, so I definitely gave myself a pat on the back for a good job. Or rather, I took myself out to see the Incredibles 2 (this was late July/early August. It was still in theaters.

I’m pretty sure I cut the basswood in half lengthwise, then I cut the pointy bit out, and tried to match on both sides. Most of this was done at night, so cue the bad phone pic here:

DSC_6980

I then taped the dowel to one of the sword pieces. Then I applied wood glue around the edge of the sword outline, and used every single clamp and binder clip I own to keep the pieces together.

DSC_6986

Then I left it for a few days, even though it probably only needed one.

I used a laser cutter to cut out pieces for the hilt from 1/8″ plywood that would slide onto the wooden dowel for stability, and I aimed for a hand and a half length. In the end I got a stacked result, then used wood filler to fill it in and round it slightly. It worked pretty well, though it might’ve worked better if my filler was wetter. It has gotten rather gummy over time. Regardless there was a lot of back and forth between gooping and sanding. Using cardboard would work pretty much just the same way, if you cut some layers and used wood filler and glue and tape to hide the corrugated edges!

hilt.jpg

Then came painting and sanding. I painted up the “blade” with white acrylic first, then with Lumiere Jacquard paint in silver. Then it was too shiny, so I sanded it. Repeat once more to see if anything changed. Add the line down the center (kinda… don’t look too close) and then sand again to blend that in.

For the hilt I first painted everything brown, then painted it with Lumiere Jacquard paint in bright gold.

jewel.jpg

And the jewel. Still the biggest pain in the butt of this project. When I was designing the laser cut part of the hilt I made pieces for the end that would allow the jewel to nestle in.

Then I tried hot glue, then superglue twice, and now E6000. It’s sticking for now.

point.jpg

So that’s how I made my prop lightweight sword!

The Moment

When I posted Spring Updates I wasn’t sure if I’d be posting again about this prop, at least not until I had completed the costume to go with it. But that has been postponed for a smidge, so I think its time to share!

If you don’t recognize this prop, you probably didn’t see the Doctor Who 50th anniversary episode. That’s okay! What you should know is that it’s central to the storyline, as its the most dangerous weapon in the universe, so dangerous that it has a conscience, who just so happens to appear as Billie Piper’s character Rose, or rather her image, but calling herself Bad Wolf. If you find that a reasonable thing, then you should definitely join the Whovians!

Anyway…

Last October I fell in love with a (relatively) new technology: LASER CUTTING!

And when I say fell, I mean I fell hard.

The panels of this prop were the 2-7th things I ever laser cut.

So I was completely new to Illustrator, but this project (and everything I’ve designed since) has taught me so much!

Back to the prop… I used photos found on the RPF (here and here) as references, and then designed all the sides. 5 of them were reasonable, since there would good references, but the one with all the Gallifreyan was more difficult. Only half-ish was ever visible, so I made a lot of fake Gallifreyan… Which was entertaining. And some of it looks reasonable, and others… Don’t. Luckily it’s only about 12 by 6 inches of ridiculous.

And I’ll probably be one of the few that cares.

I went on a week long “bender” of designing and laser cutting. I would design something one night, cut it out the next day, and then turn around and design the next one that night!

Then came time to take them all home and paint them. All the metallics are Jacquard Lumiere paints, and I used some cheap acrylic paint for other bits.  I think I had everything painted by December. And then my project brain stalled. (In January I found myself working 2 part time jobs, plus my grad school research so everything shut down. Like this blog, for the most part.)

In March, when things had mostly settled, I found myself with the inkling to get in the wood shop to make the frame. I ended up splitting two by fours for the final product, and creating an empty cube. I spent a lot of time sanding it down and trying to get many of the imperfections out. Some of the wood I had used had some kind of black paint on it, so I had to sand it down a lot in places.

Then I made the bad decision to wood burn the frame by hand. In the show prop, it was probably laser cut, but I wanted the deeper worn look. I spent 6 hours over 3 nights working on it (from 10pm to 12am) which was not my finest decision…

I borrowed some stain from a friend, and stained the entire thing, which was a kinda messy affair. My bathroom looked like a crime scene for a few hours. The stain was oil based Zar, in color Rosewood.

Then came Easter weekend. The laser cut panels were “installed,” meaning pressing them until they fit and attempting to glue them together cleanly. I had installed a small “door” into the corner of one of the sides, so I installed hinge hardware, and used some foam board leftover from a friend’s project to fill in some gaps between panels.

I was marathoning the project at this point, so I managed to get on Tinkercad and designed the corner caps, which are essentially 3 sides of a cube with a half sphere, and printed them. For a first 3D project, they turned out unexpectedly perfect! I primed each with some cheap primer spray paint and then painted the corners grey with acrylic paint mixed with some silver Lumiere paint. Then everything got glued together and I used a clear coat over everything, from the wood to the 3d to the laser cut stuff.

But this thing is huge. It’s bigger than the actual prop, and I can hardly hold it. So it takes up a remarkable amount of floor space. So I laser cut an acrylic topper, and I use it as a coffee table!

The intention was that this would be a prop useable for DragonCon, but as I said it is huge. I think it measures 16 inches cubed. I have trouble picking it up, due purely to the dimensions, though the weight would be a problem an hour in…

I’m thinking that it might be worth it to make a smaller one. I’ve only got two months, but I think I can cut down the working time to a two week period, if I do it again, since I know all the steps, and the only real thing I’ll have to buy is stain for the frame. I would definitely laser cut the frame though, before assembly, since it was way too much time to burn it by hand…

We’ll see what that idea comes to!

Sandals of Glory!

Otherwise known as my handmade sandals that aren’t terribly comfortable…yet, but they will be, and they are tailor-made for my feet!

I was looking for sandals appropriate for Kaylee and Nausicaa, since I don’t wear flip flop types and I didn’t want to wear actual boots in the Georgia late summer, and I found a couple in TJ Maxx that weren’t awful, but also weren’t perfect for my feet. I’ve got strangely shaped feet…

So I drew around my feet on tracing paper, and then added some clearance around… Too much in fact, so I ended up removing a lot, then I made paper “straps” to test the pattern, and then started winging it. I cut out four heel pieces, and then three soles and two straps for each shoe. I realized then that slide shoes were also not going to work for me. My feet don’t feel secure unless they’re tied or strapped into things, so I also cut some strappings to add to the heel to secure some ties.

So I had bought a pack of Shoe Goo (side note, did you know it came in colors? I missed that fact when I got it from Amazon, and bought black… not a good plan… In hindsight I should have read the description better) and ended up using all 3.7 ounces of it. And all of the leather was from a couple of vegetable tanned leather bellies from Tandy. I had gotten a couple of extra the last time there was an online super sale of 10 dollars a belly. And by last time I mean a few years ago… It’s been awhile since I really worked with leather. This stuff is thick, but perhaps not quite as sturdy as real sole leather, but it’s working out so far!

The heel came first. I glued the 4 pieces together with a (rough to smooth) and (rough to rough) then glued the sandwiches together rough to smooth leaving a smooth end on either side of the uber-sandwich… I used my swivel knife to rough up all smooth surfaces that were being glued with a crosshatch pattern.

For the straps I skived off the excess thickness and glued them in place to the first of the soles. For the hook at the heel, I couldn’t quite skive the leather thin enough, so I cut out a notch in the middle sole, and glued the top to that middle rough to smooth. And for good measure I glued the bottom as well, rough to rough, leaving smooth sides on the top and bottom.

This might be a good time to mention that I was using HUGE binder clips as clamps. Which might not have been ideal, but they worked out pretty nicely!

A couple of hours later I glued the heel sandwiches to the sole sandwiches, but since my binder clips wouldn’t open that far, I got out my old biology and physics textbooks to weight it down (Campbell Biology for the win!), I think with a can of leather conditioner to help “concentrate” the weight in the proper place. I then left the shoes alone for some time to finish drying.

But when I came back, I found the left one was a little too big around the toe strap, so I glued the strap to the top of the sole on the edge to help reduce the length. I had to glue on both sides of the foot to properly balance it, but it’s been working out so far…

I lace them up with some green leather round lacing that was a Tandy clearance buy a few years ago, and actually the same that I use to lace up my TARDIS corset belt. The ties run through slits I cut in the darker strap, then wrap around my ankle and themselves to cradle my foot. I tend to need to tighten them after a couple of minutes of wear, which I attribute to foot wiggling and leather stretching…

Another thing I’ve been doing is wetting the top of the sole lightly in order to bind to my feet a bit during wear, but also so it starts to take the shape of my feet. I know from experience that wearing someone’s well worn Birkenstocks can be uncomfortable because they start to pattern to their primary wearer’s feet, and that’s where I’m hoping to get with these. But maybe not that drastic. I’m definitely interested to see how they wear.

The other thing I’d bought for these were some rubber soles, but I haven’t actually put them on. I’m currently deciding if I really need to, and so far I don’t.

The past couple of weeks has been nuts with costume flurries, but slowly and surely I’ll be posting what I’m working on! DragonCon is in just over two weeks, and I’m not ready yet! Not even close!

Re-Made Vintage Craft Tote (with a miniature tutorial)

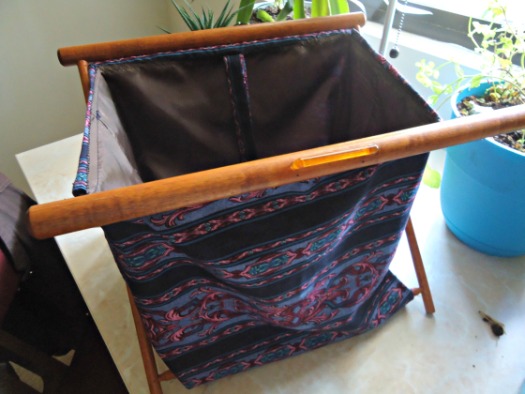
This tote used to sit next to my grandmother’s armchair and it was always filled with embroidery supplies.

She had been working on this candlewick project for years and years, almost as far back as I can remember, and right before I went to college she realized that she had enough squares to make up the desired quilt.

But since she and my grandfather moved into that house, when I was around 6th grade age, she let me help with that embroidery project. In the early days I wasn’t much help, but I did improve over time, and it was always a nice outlet when family talk got too weird, or emotional, or silent.

Now, she is living happily in an assisted living facility, and that tote was something she left behind. Don’t worry, she’s happily sewing, but she won’t remember it if you ask her!

The cover that was on the piece not only smelled old and musty, but was in various states of disrepair. I bet it had ripped a few times over, and it was patched in quite a few places.

With no further ado, I give you my magical new craft tote!

front

Isn’t it purdy? And surprisingly difficult to photograph, but perhaps that’s because I only have half a window available of sunlight right now.

And the quilting cotton I used should match one of my lap quilts, which is quite pink, as well as my general aqua/turquoise decor.

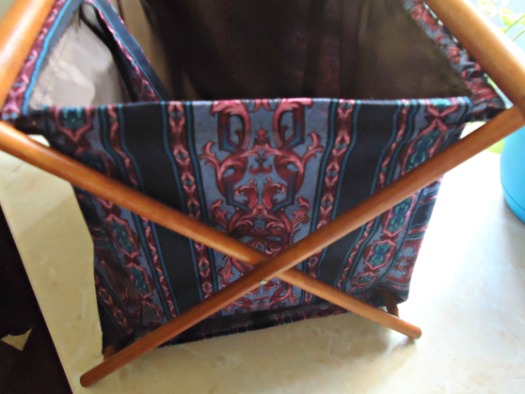
side

If you have one you’d like to recover, it’s not a difficult job! I spent a couple of hours taking apart mine, which most of that was spent trying to unpick the fixes and getting distracted by CSI. And sewing it took less than 4 hours, and that’s with unpicking a major part of the bag.

If you want to build one, the frame to mine looks a lot like this hamper from ikat bag. And you might want to follow instructions for her bag too! They look fantastic, and its washable. You can also get them for about $25  from etsy, and probably ebay if you search wooden frame folding tote,

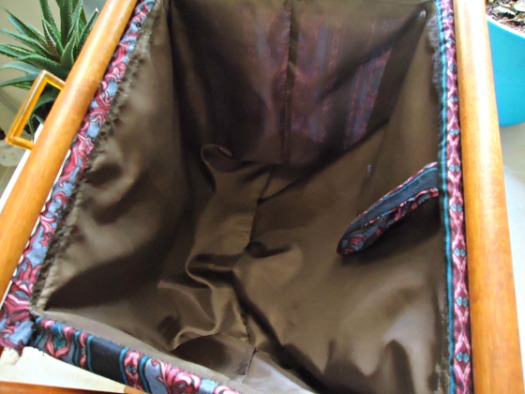
Mine has a lining, though, and its essentially sewn into the frame. So if you want to follow along with my badly illustrated tutorial, read on!

You’ll need maybe a half yard of outer fabric, and a bit less than that for the lining.

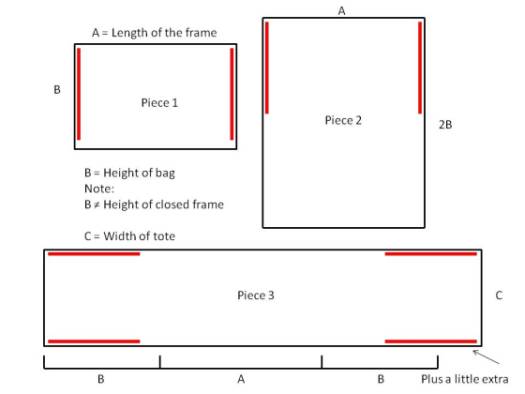
Also, be forewarned that I’m using algebraic phrases. Forgive me, I’m a math person.

So these are the pieces you’ll need, based on your frame dimensions. First the outside pieces:

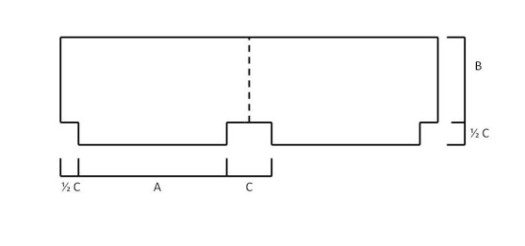
Slide1 And then the lining piece:

Slide2I cut the lining piece on the fold indicated by the dotted line. So the lining piece gets sewn up along the B side, and I also sewed the fold, for continuity. Also sew up the bottom, along the A side. Press everything, cause the lining fabric is probably being difficult. Then fold out the corners of that cut out square area, so the bottom lies flat and sew across.

Now the outside. Sew piece 1 to piece 3 along the red lines, where piece 3 is the sides and bottom of the “bag.” Stop at least an inch to an inch and a half before each edge. Don’t forget to backstitch! Then sew piece 2 to piece 3 the same way.

So this is the tricky part. You now need to put the bag into the frame. Do you notice that piece 2 now has that extra section hanging off the edge? That will be folded over. Before we continue, you should take the time to finish all raw edges except the top, and where piece 1 and 2 will meet. So mostly that’s the long area of piece 2, and the sides of piece 3 beyond its attachment.

Now, with the frame closed, note where 1 and 2 will meet. You’re going to need to sew this from the inside, which may mean you have to stop in the middle and wiggle the fabric around. It’s okay! So carefully pin the insides together and sew that seam up!. You’ve got a bag trapped on the frame.

Just fold the top flaps leftover from your side stitching over the top of your frame, and sew in the lining. And voila! You’re done!

That may not have been clear, but now its on the interwebs, so that’s okay!

jnside


Shiny

This project took me forever.

I was looking up when I ordered the parasol in the first place. It was the end of September. That was a long time ago, wasn’t it?

This is basically the same one I got, which is the perfect size in every way, except it doesn’t fit well on my desk… So painting it sometimes got touchy.

Now, I then didn’t start painting until the first of our snowstorms. Because what else was I to do? So that was February…

I also have nearly no in progress shots, because I worked on it mainly at night, or when it was raining/snowing, neither of which provide enough natural light to take nice pictures. I do have this one though.

For paints, I used the cheap acrylic for all of them. I’m talking the 50 cent paints at Walmart. Maybe they’re a dollar, but either way, very inexpensive.

This might be why I needed nearly three coats to get the green to look solid, not streaky. The yellow and red didn’t have that problem, but the green and I were not getting along.

But the funny thing is, a few days after some snow melted, and we were back in classes, the power went out at home. I’m pretty sure that’s why I woke up before my alarm. Since it may have been three hours till it came back on,  as expected by the power company, I decided to pack up the project and take it into work.

In my defense, I’m still basically only taking classes. This first year of grad school is basically undergrad part 2. So when I don’t have a class until 12, am I going to do work in the morning? Or rather, on a Friday, with no homework due in that class, what am I supposed to do in the early morning?

So I finished it up, and during my mass photography escapade (where I also photographed my shawl, and a yellowtail cami that’s upcoming, and maybe something else too), I got some nice pics.

And there you have it! A lovely parasol in a Kaylee style. Yes, I did wait for the entire post before I mentioned Firefly. Can you notice my restraint?

Because I’ve been squealing internally ever since it was finished.