Big Dragon Shaped News!

I teased this a few weeks, maybe months, ago, that I have very big news to share! It’s grown, and I’ve got some additional news as well!

So let’s start with the newest of news, and then work backwards, since I want to keep building up to the biggest stuff!

back featureAbout a week ago, I found out that I won an Indie Pattern Month prize on The Monthly Stitch for the Hack It competition! I was able to pick a few lovely patterns, which I’ll be sharing with you when they get to me! (Although realistically I probably will forget to share and you’ll find out once I make the actual garments). Congrats to all the other winners for all the challenges!

A few weeks before that I signed up for a sewing dare from Gillian at Crafting A Rainbow… I’m telling you guys this so I stay accountable. Since I’m pretty sure I haven’t yet made anything toward this dare yet. Soon though. Next week I’ll get back from my last summer trip and will have plenty of time to “to sew a head-to-toe Closet Case Files outfit!” Realistically I’m going to make a Nettie top and a Ginger bottom, but which of my planned Ginger’s (flared and a boot/skinny version), and sleeveless or sleeved Nettie? Decisions, decisions.

Okay, have we had enough build up yet?

Cool.

Because guys, I’m going to DragonCon!!!

To those who follow my blog for the sewing, not costumes, this may be the biggest comic/fantasy/TV/movie/[insert geeky thing here] convention on the East Coast of the US. And I’m going with the same friends that I was planning on going to San Diego Comic Con with two years ago. That’s right, it’s been two years and we’ve finally got our schedules correct and we’re all on the right side of the country!

We’ve got two group costumes planned out, and then we’ll be doing our own thing the other two days (costumes-wise at least!).

My costumes going with me that are already (mostly) complete are Susan from Prince Caspian, and the TARDIS. I say mostly because I’ve been adding trim to the skirt of the TARDIS, and I’m considering an alternate top because it’ll be Georgia in the summer. And therefore hot. And now that I’m thinking about it, I might have a Clara Oswald to go with the TARDIS. Wrong TARDIS, but hey, that’s okay!

nausicaalink/link

One of the costumes I have to make in the next month and a half are Nausicaä from Miyazaki’s Nausicaä in the Valley of the Wind for a Miyazaki group. I haven’t decided if I’m going to do her early outfit or her end of movie outfit. Both of them are blue, so I’ve started gathering fabric, but I need to design soon!

arielbluelink

For a Disney group, I’m also going to be making a Little Mermaid Ariel Day Dress. I’ll either be making a normal skirt, for which I’d need to get fabric, or culottes, in which case I might have some. I’ve got two options for the top as well, based on how well my corset patterning for my insane Cinderella project goes. I can either make a corset and wovenblouse to go with it, or I can make my Nettie hack corset top. Because easiness and knit are great things, and corsets and potentially driving home don’t really appeal to me. But the one I made before is from a lovely drapey knit. That has also been inconveniently becoming more translucent with every wash.

kaylee coveralllink

I’m also making a Kaylee costume as a backup for if it’s two wet or mucky for the TARDIS or Susan. I’ve had the jumpsuit for a few months now. I didn’t realize how comfy they were, but they’re great. I just need to alter it a smidge, and then find and add patches and make a Kaylee shirt. So a little more direction and a little less wiggle room. Because I really need it as backup. And maybe I’ll make a purse out of some cheap turquoise brocade. To pull it all together.

So that’s my news! I’ll be updating soon, once I get my sewjo back in swing. Last week was a hard week with all the tragedies around the US, and after a long 4th of July weekend spent with my friends sewing, I got a bit burnt. So hopefully writing this post will kick my butt into high gear!

Because I’m going to an insanely awesome con with my two bestest friends, and it’s going to be lovely, and awesome, and I’m going to stop before I ramble for another paragraph.
Year 3

WordPress informed me that yesterday was my 3rd blogiversary.

The past two anniversaries, I wrote a post celebrating the year, and especially because this is also my 200th post, I figured I’d give it another whirl.

This year:

storybook back

I finished my Susan dress! Woohoo!

My self imposed ban of new clothing has kept up really well, and the only piece of clothing I’ve bought was jeans from a thrift store.

ponyfront

I’ve self drafted a few items, including the shirt for my Peggy costume (with more full costume photos to come).

right after wash

My first pair of jeans were not entirely comfortable (so not wearable), but my second pair is so comfy that I practically live in them.

sweater

I’m working on a knit sweater that will actually look like a real sweater, which is definitely a first. And I’m another pair of socks and a half into my sock knitting journey.

back side

Real photos of my Belle from Once Upon A Time (casual style) costume were taken, and though I realized I forgot the necklace, they certainly look snazzy! I do need to figure out how to make the extensions better blended though…

cute

The time I spent embroidering this Merida skirt was ridiculous, but I love this skirt to death. It’s whimsical and subtle and awesome all at the same time!

I’ve also realized that my planning skills are rather lax, and that sometimes I’ll completely change my mind and take on ridiculous projects. Case in point, even though I don’t have real space in my apartment to make a ballgown, I’m planning to make Ella’s ballgown from the live action Cinderella.

First though, I’ve got to make and finish my TARDIS skirts. After three years it’s really time.

Here’s to year 4! Thanks for reading!

Quiver – Part 2

My unfinished quiver sat around for over a month between the first part and todays, but it was mostly because I was trying to determine the best way to sew it up.

I thought I could maybe butt up the two sides so they would form a solid point… My leather was just a bit too floppy for this.

I thought maybe I could fold under and sew it up like a seam. My leather had just too much structure.

And then it became the lace versus waxed thread debate. And where would I even attach the belt?

So I waffled.

initial

But I knew that my TARDIS belt was going to be made of leather, and I have a policy for leather goods and myself, that I am not allowed to cut into leather if I’m still working on a different piece. So I had to finish the quiver.

stitching

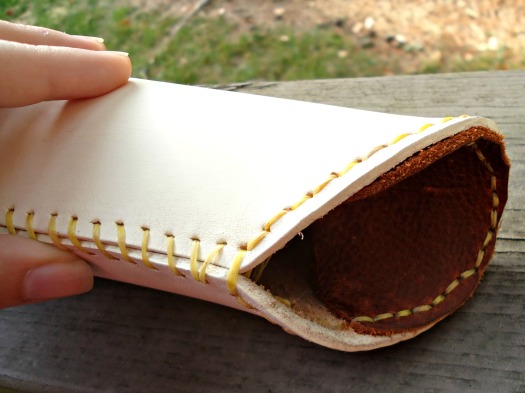
Using my trusty awl, I punched holes every 1/4 inch both up the seam line and around the bottom, since I knew I’d be attaching a cap to the bottom.

Waxed thread was my “weapon of choice” in the end. I used a whip stitch, I guess, to sew up the seam, which seemed to hold it very stably.

inside

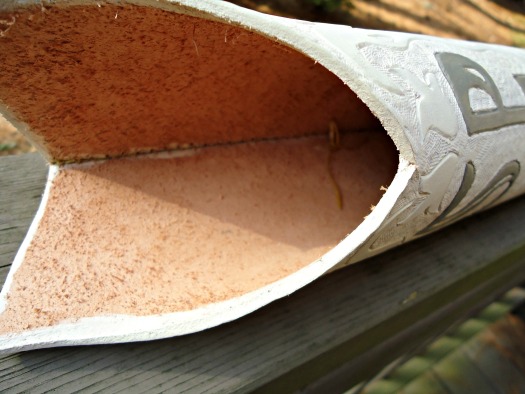
I had intentions of attaching the belt by running it through the quiver itself, but that didn’t pan out. For one, I only had as long as a partially used cow belly, which was not as long as I was expecting. Threading it through like that also made it really blocky and uncomfortable. Comfort is key in the costume game, especially since I’d already be wearing a corset, which is enough comfort-restraint.

top

So I ended up running a few loops of waxed threads to serve as attachments for the belt. It works well for now, but I’ll probably need to adjust it in the future.

Then I actually needed to make the belt.

belt

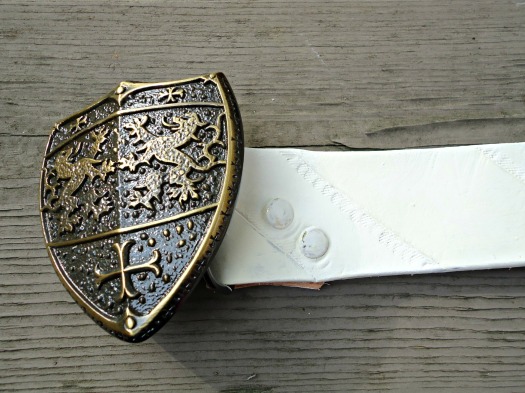
I wanted it to be something I could potentially wear, since I love the buckle so much. Isn’t it just the cutest shield ever? But I also knew the belt had to be long in order to cross my body like a messenger bag. So I made it as long as I could, and punched holes in various places, so I could wear it at my natural waist, or through jeans, or through the quiver. I cut a simple design using my swivel knife, just diagonal lines, and I tooled a few sections for some visual interest. It doesn’t show through the paint though, so I ended up painting a very subtle alteration between cream and ivory, based on my ability to mix paints well, which ended up with a more ivory batch right at the end of the painting cycle.

So that’s it for my quiver! Isn’t it purdy?

Quiver – Part 1

Even though Susan doesn’t actually wear her quiver with her final gown, it was still a must have prop for me.

Though it is very likely that the cosplay I see is not a full indication of people’s geeky interests, I’ve always thought that Narnia fans, of the movies more specifically, are more subdued (aka they don’t cosplay). There have been a few wonderful ones, but altogether the cosplay quantity is rather low.

tease

So the likelihood that I would be easily recognized from the costume alone (and with my hair, not a wig) is slim. I’m already risking the Lucy vs. Susan issue, with the red hair, but anything to make the costume more recognizable is good.

Plus I’ve always wanted a quiver for all the imaginary arrows I have.

The problem with Susan’s quiver is that it is likely meant to be ivory, or rather it was carved in one piece. There have been some good reproductions made with PVC pipe, but I didn’t have the requisite skill set. So I decided to use leather, something I do know a bit about.

I took pictures like this was a real tutorial, at least for this first half…  and then I let it sit for two months before I finished it. But that’s another story.

pattern

I started with posterboard, knowing that I had a limited amount of leather big enough to create this quiver. I drew a pattern, dragged a belt from the closet to “try it on” and fiddled with the pattern until it felt right. It slimmed down a bunch, and shortened as well, so that it would feel proportionally right on me.

Then came time to cut into the leather. I managed to find a big enough piece, and I used my rotary cutter to cut clean lines through… Leather is like fabric, right?

begintool

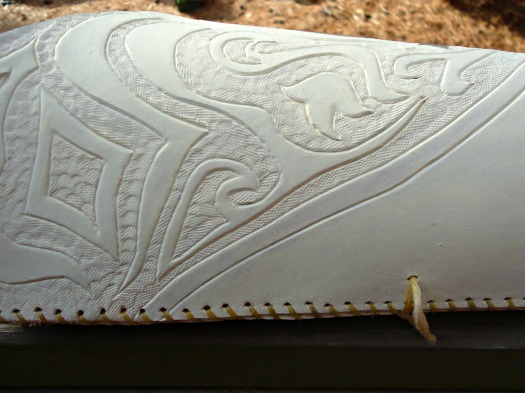
I had previously drawn designs for the top of the quiver, but they  didn’t precisely fit, so after some tweaking I got a useable pattern and traced it on. I cut into it with my swivel knife, and began tooling.

finishtool

And here it is with the design finalized!

The real quiver has a picture of Aslan carved in the bottom, but I didn’t want to take this that far.

So I began painting. I had both white and cream acrylic paint, neither of which was perfect, so I mixed the two and diluted with some water.

first

The first coat turned out streaky, and it ended up taking 4 coats before I was satisfied. In the tool-work, there’s still some areas of low paint, but I’m learning to give it up.

DSC03285

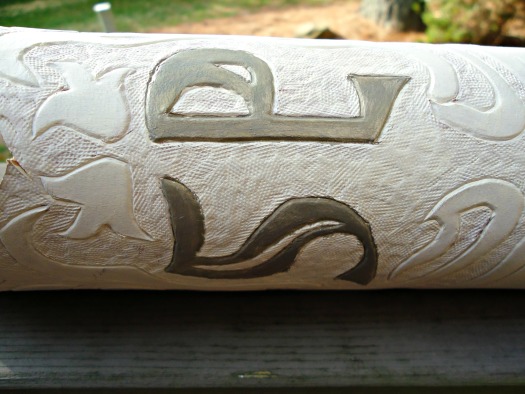
I then painted the initials with a grey and gold mix of paint (though technically it was a mix of cream, white, black, and gold), with the gold added in for a bit of sparkle… Not that its really visible, but it can be seen in real life.

Look out (hopefully) next week for part 2 of my quiver fun!

Catching up!

Last time we spoke, I was making socks.

Scratch that, I succeeded at socks. And actually right now I’m working on another pair.

I’ve been working on stuff since then, but slowly. And at the same time quickly. I seem to have made a lot of stuff, but for some reason it just seemed to come out of nowhere. Blog posts, however, did not.

Individual posts should be coming up soon for these, but here’s a snapshot of what I’ve got:

teaser

teaser

teaser

teaser

teaser

And a few more that aren’t quite completed or photographed yet.

I’ve also begun Christmas presents early… as in the aforementioned socks. I know that most people say that and then promptly fall off the wagon, but I’m a woman on a mission… Objective: finish gifts before November, or at least before December. That really means before finals season. I wish I could show you what I’m working on, but then I run the risk of ruining what little surprise they’ll have left.

Cooking has also come up recently as a thing. I’ll admit, I love to cook and bake and candy-make, but rarely do my concoctions turn out pretty, or appetizing to people other than me, or at all. For instance, the last bit of bread I made turned out tasty, I guess, but dense… Having now watched the video on how to actually make a round bread loaf, I think I’ll do better next time.

Knowing that I’m not a food blogger, and that I have no interest in becoming one, I think I’m going to start occasionally highlighting recipes that I’ve used or want to use. Making food can be cheaper than making clothing and yarn stuffs. And therefore I’ve been doing quite a bit of that this summer, so I’ve already got plenty of fodder for these posts.

Well then… talk to you soon! Err… sooner than the last time I posted.

What I did last night…

I’m thinking this could be a regular thing.

Or not.

I remember what happened to Design Donnerstag… Maybe I should resurrect that too…

But at least for this post, I did makeup tests for three of my cosplays.

One was overdue, one was right on time, and the next was premature.

I should insert the caveat that I have no idea what I’m doing, though I find that trolling through picture tutorials have helped. I’m not one for makeup Youtube videos, and my general lack of interest in wearing makeup day to day, have really hindered my makeup skills. So bear with me, and half of the stuff I used came as parts of beginner makeup kits from…. when I was in eighth grade… I’m going to hang my head in shame.

But I learned some stuff! Some stuff that I will share with you right now:

trial1

First up: Claudia

A bit overdue, considering the entire costume was finished last fall…

So the major bits of importance: A nice pink lipstick (though can I bring up memories of that weird one she wore for an episode? I think it was the Civil War reenactment episode…shudder), mascara, heavy eyeliner and dark eyeshadow… Oh, and brow pencil. Not that you can tell about any of the last three.

Lessons learned: I need some eyeliners with heavier pigment content. I’m personally thinking gel liners because pencils are too thick and less controlled (and the sharpeners are irritating), and the liquid liners I’ve tried are tricky and therefore irritating. I need to use a darker eyeshadow as well, which I might have but I really wanted to use this one. Maybe I could combine them? I also used my brow pencil, to make my eyebrows a bit more auburn, mostly cause Claudia sports a lot of very filled in dark eyebrows. However I haven’t plucked or in any way shaped my eyebrows in months, or longer, so my efforts at filling in were thwarted slightly.

I like the lipstick though! And I think the foundation layers are going to work, unless I find the need to buy different stuff. I’ve always been interested in mineral makeup, and have some samples, but I’ll need to try them out… Perhaps that’s going for my next test!

trial1Second: Belle

This is actually the first one I did, which may explain the natural light coming in the window as opposed to the lightbulb light in the other two pics. I’m terribly proud of this one though, even if most of what I’m proud of can’t be seen in this pic.

Important bits: Magenta pink lipstick, gold eyeshadow in multitudes, grey and brown eyeliners, though I bet you can’t tell, mascara and my rather new trusty eyelash curler.

Don’t eyelash curlers look like torture traps? I was surprised the first time I used one how comfortable it was… I mean, not comfy but not painful. It is quite effective though.

Lessons learned: My gold palette of eyeshadows is really not pigmented. After three separate brushings of the gold, I still could not tell I was wearing anything. When I used a sample of mineral eyeshadow, though, it looked very nice. I think I’m going to need a new gold palette. I also am going to make use of the gel liners, whenever I get those. And eyebrow plucking. I never think I’m going to care about it, since I like my semi-bushy eyebrows, but they have a shape of their own that I’d like to preserve. Also, I’m planning on adding a little more of a bow to my upper lip, just a smidgeon. I don’t have that much of a natural one, so I like to add one when wearing lipstick (which never happens), but I often think it looks a bit overdone. Work to do!

trial1Finally: Susan

A bit early, considering I’m not really halfway done with the costume, but I was on a roll!

Important to note: Pink lipstick (look it matches!!) Eyeliner on the top lashes only, a little light colored shadow. There will be mascara, but I don’t particularly like the brush on it, so I’m going to need to buy some new ones. I did also try to add some freckles, but they didn’t exactly show up in the photos. At least not any more than my skin looks kinda freckled.

Lessons learned: The same base makeup that looked fine for the previous two looks is a bit too tan for Susan, who is quite fair and pinkish on top of fair, but not tan. Next time I’ll use a lighter foundation. Gel liner will be helpful, as well as better mascara and some pluckage… The light colored shadow I used was a part of the gold palette, so I’ll probably need another one of these as well.

The TARDIS costume needs to be at least a bit more made before I’m even going to attempt a makeup trial. Make that it needs to be actually started…

How are your costuming makeup ideas working for you? Or do you have any makeup tips for me? I’m all ears!

Phyllis

The farther I get into making my Susan costume, the more I realize that there are not many easy titles for blog posts… I almost named this one Gastrovascular. Then I realized that was creepy.

It has been a while since I’ve worked on this, but I realized it was high time. Now the undergarments are finished, and I’ll be getting to work on the overdress!

So the fabric is quilting cotton, a white on white floral pattern. I had three yards of fabric, supposedly. In reality it looked more like two yards, and maybe a quarter more. I also have a very bad idea of distances, so it could just be me.

front

First I cut off the pieces for the waistband and the “sleeves.”

The sleeves I basically just winged, hemming the sides, and then folding over until it felt right. I cut the full length of the fabric in half, so its about 22 in for each side. I know that when I wear it for real, I’m going to have to Topstick or otherwise adhere the sleeves to a proper point on my arm, which I’ll figure out later, when the overdress is finished.

floor

The skirt then used up the rest of the fabric in pleats, though I ran out of pleating room towards the back. I used a technique I learned for stage costuming for the closure. AKA if it’s never gonna be seen, don’t bother with a zipper.

back

So I just made a simple opening, with a skirt hook and eye. That does cause that gappage in the back, though its never gonna be seen, and I’ll be wearing a slip, just like I am here (in case you were wondering…).

pleats

Look at that pleating job! But I will have to re-iron all of it. Humph.

So that’s it I guess for Susan’s undergarments!

But I shall leave you with the motifs for Belle’s necklace! So one of these days (meaning hopefully today or tomorrow) I’ll finish that up and soon after will have a blog post on it! Yay for costumey things!

motifs

Overbust for Wearing Under

After this moment, this corset is not seeing sunlight…

DSC01716

It’s not that theres’s anything particularly… wrong with it.

It does give me a bit of a flat chest, which is an interesting sensation.

It also does no “lift and separate” favors, which I’ve heard about for overbust corsets.

Perhaps that’s because its a modified version of Butterick’s 5797 corset top pattern. I wouldn’t put it past the patternmaking company to completely disregard such a notion.

DSC01718

I had to take this in at many of the seams. The rounded side panels were fine, but the side seams needed to be less drastically curved and taken in. The bust ended up being much too big, so I had to reduce those seams, as well as reduce the dramatic cup that had been formed. I also took in the seams around the back panel.

Choosing this pattern was more of an endeavor to understand construction of such a garment rather than wanting to make up the pattern. But I did need an overbust corset, for my Susan costume, so I thought I’d take the plunge.

DSC01722

What I’ve decided for Susan, now that it’s been brought up, is that my undergarments will be separates, a petticoat with a pleated front panel, and a removable collar piece which will attach to the corset that I’ve made. By making the corset boned, and not the overdress, it allows me to use the corset in future endeavors.

For the fabric I chose to use two layers of duck cloth, which I had purchased at Walmart last year, and a nice separating zipper. I also had some grosgrain ribbon, which I used for binding the upper and lower edges, and I used heavy duty cable ties for the boning.

DSC01711

So it is zipped in the back. More for ease than anything else. I don’t enjoy wearing things that I can’t remove myself, and because the overdress will have hooks and eyes at the front, I didn’t want to put lacing, busk, or a zipper there, so I would need a back closure. At that point, a zipper would be perfect!

I do get a bit of reduction at the waist nevertheless, which is both a nice feeling and a bad one at first.

The real reason why I’m a bit embarrassed about this is that I basically used up all of my bobbins on this corset when I was tacking down seam allowances and boning channels. So when you get close it’s quite colorful and messy. But I love it anyway.

DSC01719

Second corset completed!

One day I’ll tell you about the first.

February Project #1

Stashbusting Stats: 7 fabrics used

Happily Beading Away!

So… It’s time for an update.

Since the last one, I’ve finished moving into school, gone to a wedding, and went through my first week of classes. Which is why it’s been a while.

But the show must go on!

I’ve been working on my necklace projects at the moment, as I work on getting my serger up and running.

Remember how I was working on my Belle necklace, getting the swoosh bits finished? The ones that look like question marks, without the dot?

2013-09-08Well I’ve got one of the two mostly done! Some strings to handle, of course, but its pretty much finished! Only one more to go, which I’ll likely be working on over the next week.

After finishing these swooshes, I’ll be then designing and creating the smaller versions, which will then allow for the real creation of the necklace!

Then I decided to work on the TARDIS time rotor. I finished making all the baubles, and made the loop to thread it onto a chain.

9-8-2013There’s still something missing from it, and I’m pretty sure that I have figured it out.

The second bauble from the bottom is a bit too small. On the time rotor in the show, one of the spheres is significantly bigger than the rest. I tried to emulate that by encapsulating a slightly bigger round bead, but it doesn’t show nearly enough. I’m going to put another layer of the clear beads on top, which should increase the outward appearance of the bauble, making it more like the actual time rotor.

Should be done shortly, so look out for a final post for the necklace this week!

Also, I finally got a picture of this nice leather purse I purchased before I got home from abroad.

purseNice and sweet  little cross body bag. If I don’t make another purse option for my Susan costume, this will be the purse for it.

It’s small enough to not detract from the awesomeness of what the costume will be, but large enough that I’ll be able to keep some money and small souvenirs or papers and stuff. It’s even something I’ve been using in real life, because it’s cute, and just enough space to for wallets and such.

I’ll see you soon when I finish the time rotor!

T Minus One Year

In one year I’ll have a bachelor’s degree, and hopefully some sort of employment.

I’ll have had this blog for a year and four months or so.

I’ll also be going to Comic Con.

Which was the main inspiration for starting this blog in the first place.

I wanted to let you know what is to come in the next year, in a more updated and compact list than I have before.

Costuming:

TARDIS costume – Doctor Who

one year plancorded petticoat

bum roll

console skirt

bustled overskirt

underbust corset

high necked sleeveless shirt

sleeveless shrug with dangling pearl “sleeves”

time rotor necklace

hair embellishment of some sort

television monitor purse (which will attach to the corset

spats for my t-straps

Belle – Once Upon A Time

one year planLace and knit skater dress

embellishment necklace

Queen Susan – Narnia: Prince Caspian

one year planwhite underdress

blue overdress

potentially a quiver – like object

Claudia – Warehouse 13

finishedfinishing off the vest – lining and a new zipper

necklace of some sort

Steampunk base costume – potentially for Halloween. Or life in general.

tumblr_l0mve9KlSv1qam7v8

link

corset waist skirt

___Phish_Food____by_charlie140588

link

Short sleeved high necked button down shirt – emerald green? I like this simple version of the drawing

Corded Petticoat with Corset

link

short corded petticoat

Sewing:

UFO #2 – Velvet and Lace Vintage Dress

Kaylee inspired dress – Firefly

Ballroom dancing gown

Refashioned Ready To Wears (so I’m willing to be ready to wear them.)

Knitting/Crochet:

Lacy slouchy hats

Thick shawl

Some necklace making, some quote illustrations, some cards, some leatherwork.